
You may have a beautifully designed website filled with loads of useful content, but how do you know that it’s in tip-top shape? How do you know if in fact it doesn’t have tens of 404 not found errors (a result of broken or dead links) that your visitors keep landing on or if tens of spammy sites are linking to it, harming your reputation? How do you know if your efforts are paying off?
That’s what Google Webmaster Tools (GWT)* is for. This suite of tools helps you identify issues with your site as well as opportunities so you can use this information to tweak certain pages, improve your site’s performance and boost website traffic. It can even let you know if your site has been infected with malware (which is something you want to deal with right away).
And the best part? It’s free.
If you haven’t used GWT yet, this guide will walk you through the various features and give you insights into what useful data can be found within and, of course, how you can use it to improve your website.
*UPDATE: On May 20th, Google announced that they have renamed Google Webmaster Tools to Google Search Console.
Table of contents
What is Webmaster Tools?
Why should you use it?
How to set it up
What valuable information can you find and use to improve your site
What is Webmaster Tools?
Google Webmaster Tools is a free toolset provided by Google that can help you understand what’s going on with your website.
Unlike Google Analytics, which focuses more on the marketing part, giving you stats on who’s already visiting your site and what they’re reading there, GWT is more focused on the technical side of your site. For example, if Google wants to inform you about problems with your site’s code, links or indexing, it will do so via your GWT account.
Google Analytics is great for gathering data on your current audience while GWT gives you actionable data that you can use to form strategic campaigns to bring in new traffic. This includes a list of external sites that are sending you traffic, keyword ranking data, traffic trends based on content, keyword insights and even structured data errors. You can download the data and analyse it in order to find opportunities.
Why should you use it?
If you’re a small business, you probably don’t have a big budget set aside for tools that can help optimise your site for search engines. The truth is you don’t need to because Google Webmaster Tools is absolutely free and it provides valuable information about your site that you can’t be without.
Just to name a few, with GWT you can:
- See all the sites that are linking back to your website. Are these high-quality or spammy sites that can harm your reputation?
- Fix issues with your site. Google will notify you if it finds broken links, pages with duplicate content, errors while trying to crawl your site and even malware.
- Get instantly notified if Google penalises your site. For example, if the search engine giant releases a new update and your site gets a manual penalty, you’ll be informed so you can take action immediately.
- Disavow unnatural links to avoid a penalty or to help your site recover in case it has already been penalised by Google.
- Find out which queries caused your site to appear in search results and also which queries brought in more traffic to your site.
- Understand how Google sees and ranks your site.
By using GWT you will get a better understanding of how Google views your site and then use that information to optimise it and increase its performance in search results.
How to set it up
Now that you know how much value you can get out of GWT, let’s set up your account.
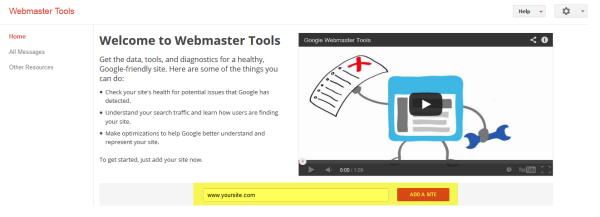
If you don’t already have a Google account, you’ll need to sign up for one. Login to your new Google account and go to Webmaster Tools.
Click ‘Add a Site’. And enter your site’s URL.
You should add all the URLs of your site, with and without www, and with HTTPS if that version exists:
Verify all the possible versions, even if there’s a redirect in place from HTTP to HTTPS or from non-www to www.
Next you will need to verify that you’re the site owner. It’s a simple process, and it’s even easier if you’re already using Google Analytics.
You have five options to verify ownership:
- Upload an HTML file to your server – By default, GWT will recommended this option. This involves downloading a HTML file provided by Google that you then need to upload on your site, and then access the link in a browser.
- Add a meta tag to your site’s homepage. Find out how
- Verify by signing in to your domain name provider. If you’re a 123-reg customer, read our support article for step-by-step instructions on how to verify your 123-reg domain name with Google.
- Add the Google Analytics code you use to track your site – This is the easiest option. If you’re already using Google Analytics with administrator rights, you can verify your site using the Google Analytics tracking code associated with the site.
- Using a Google Tag Manager containing snippet code. Find out how
Once you’re verified, you will be taken to the Dashboard that looks like this:
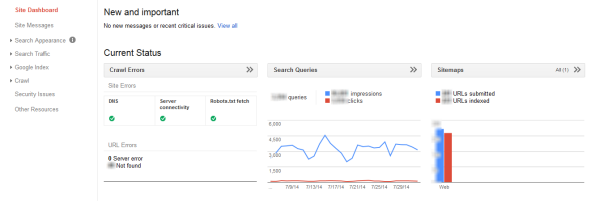
Note that sometimes it may take a few hours before you see any data so be patient.
The dashboard shows you an overview of:
- Crawl Errors
- URL Errors
- Site Errors
- Overview of the number of search queries (plus clicks and impressions)
- Sitemaps (including submitted URLs and indexed URLs)
The ‘Settings’ section

By clicking on the gear icon in the top right corner, you can change the following settings:
Webmaster Tools Preferences
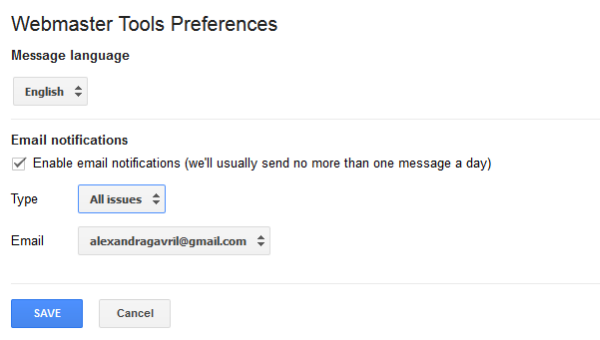
This is where you can specify whether you want to receive a daily digest of your messages, and the email account you’d like them sent to. Make sure you add an email address you check on a regular basis.
Site Settings

Here you can set your preferred domain and tell Google how you’d like your site URL to show up in search results, with or without www: http://example.com or http://www.example.com. Either one works so just select which variation you prefer.
You can also set the Crawl Rate which is the number of times you want your site to be crawled by Google. Only change it if you feel that Google bot (Google’s web crawling bot also called “spider”) needs to crawl your site more often. That’s the case when you add and update content on your site frequently.
However, be careful with this because if Google crawls your site too often, it can slow down your server which can impact your site’s performance. This can lead to your web pages taking longer than usual to load which is not good because page speed is not only a Google ranking factor but it can also affect customer satisfaction and conversions. It’s best to leave it up to Google to determine the correct crawl rate for your site based on how often you update your site’s content.
Change of Address
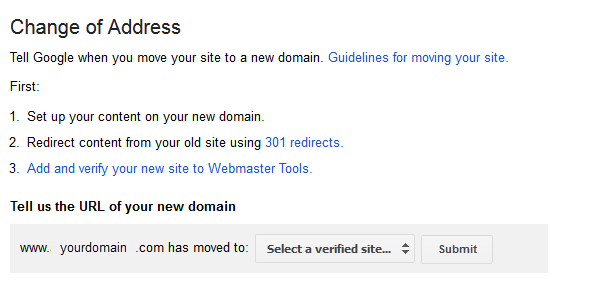
If you are moving your site to a whole new domain, do a 301 redirect, then make sure Google knows about it here. Check out the complete guide from Google that explains how to move a site with URL changes. You might also want to read our post on how to move to a new gTLD without hurting your SEO.
Google Analytics Property
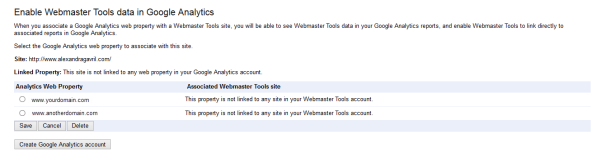
If you want to see your GWT data in Google Analytics, use this tool to associate your site with your analytics account. If you don’t already have a Google Analytics account for your site, you can create it here.
Users & Site Owners

Here you can add a new user to your GWT account. There are two main user types: ‘Full user’ and ‘Restricted User’. Restricted user accounts are useful if you want to give people access to the data, but don’t want them changing any settings.
Associates
In this section you can add an associate user that can’t see any data in your GWT account but can perform actions on behalf of your site such as creating an official YouTube account for your site or posting to Google+ on behalf of your site. This is useful if you have someone else managing your Youtube and Google+ accounts.
To add an associate user:
- Click on the “Add a new User” button.
- Enter the email address of the associate you want to add.
- Select the type of association you want.
- Click “Add.”
Site Messages
In the menu on the right, under Site Dashboard you have Site Messages which is like an inbox where you will receive messages from Google in case:
- Google thinks your site may have been hacked
- Google detected unnatural links pointing to your site
- Google thinks links pointing to your site are using techniques outside Google’s Webmaster Guidelines
- Any other situation that comes under the “manual actions” category.
What valuable information can you find and use to improve your site
Now the fun begins!
GWT provides loads of data that is split into six sections, as follows:
- Search Appearance
- Search Traffic
- Google Index
- Crawl
- Security issues
- Other resources
Let’s look more closely at what data you can find in each section and how you can use it to improve your site.
1. Search Appearance
If you don’t like how your site appears in search results or if you notice a low click through rate (people aren’t clicking on your web pages in search results), go to this section. It may be because elements of your search snippets such as Meta Title, Meta Description or the Structured Data aren’t enticing users to click through.
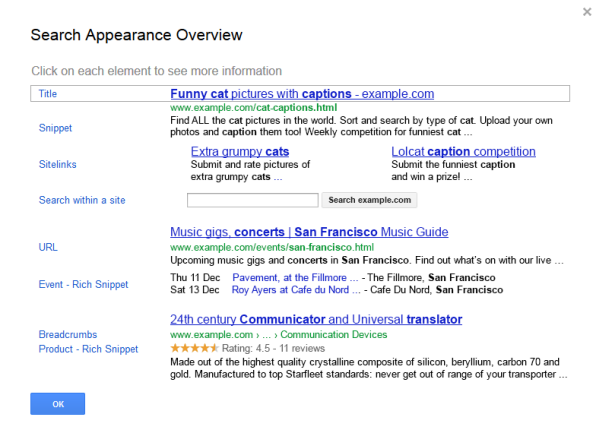
If you click on the ? icon to the right of the menu, you will see a nice breakdown of the various elements of a search engine results page (SERP). You can click on each element to find out more information about it and see how you can improve your look in search.
Structured data shows you all types of rich snippets that Google identified on your site, such as a linked Google+ author profiles or product review data. You can actually control what those snippets say about your business by creating structured data (which is what Google uses to create snippets). Find out more about search snippets and how to use them to boost organic traffic.
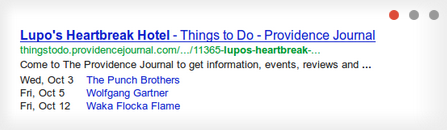
Data Highlighter is a tool that tells Google what’s important on your site and what information you want to appear in search results when users run a search for your website. This tool helps present your data more attractively and you can use it to markup events, restaurants, products, software applications, movies, books and more.
For example, if you have a consulting business and have a few events a month where you provide training, you can use this tool to tag data the name, location, date, and so on for the events on your site. After Google crawls your site, the event data may be shown as rich snippets in search results pages, in a manner similar to this example provided by Google:
To use it, you just need to tag the data fields on your site with a mouse which is much easier than having to implement rich snippets which requires some coding skills. Here is a short video with step-by-step instructions on how to get started using the Data Highlighter.
HTML Improvements
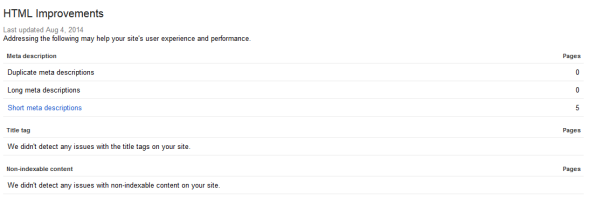
This is the perfect place to quickly identify on-page SEO issues. For example if some of your web pages have duplicated or long meta descriptions, this section points out where you have these issues so you can correct them. Click on any of the errors to see more details.
Sitelinks
You know those additional links that show up under the search results? They’re called sitelinks. For example, when you search for “123-reg” on Google, this is what you’ll see:
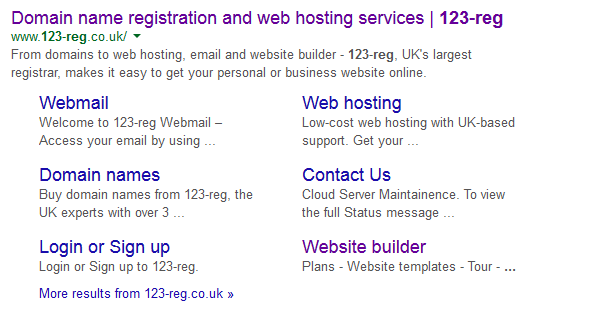
So aside from the link to the homepage, you also see a series of other links to different pages from the 123-reg website. Unfortunately, Google has complete control over which sitelinks appear in search results but if there’s one that you don’t want showing up in search results you can remove it. Just add the URL of that page and click “demote”.
2. Search Traffic
Search Analytics
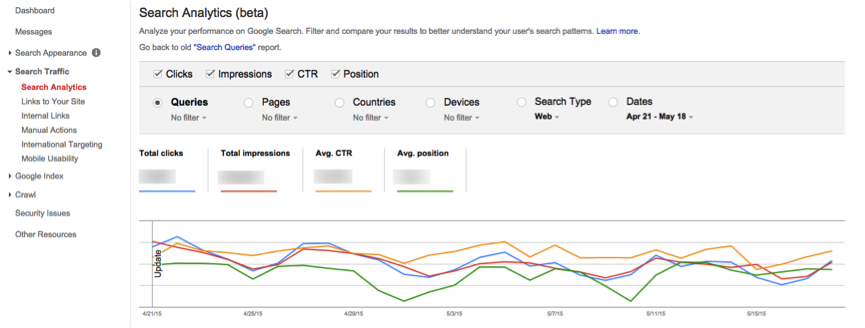
The Search Analytics report replaces the old Search queries, providing many more insights and useful information than ever before. This report allows you to do lots of filtering. You can filter data by a specific keyword, see how many users reached your site searching for that keyword, compare it to a previous date range. You can even compare desktop versus mobile search to get some insights into how many users are visiting your site using their smartphones for example.
To the top of the report you will see that you have a choice of four metrics that you can select via the checkboxes:
- Number of clicks
- Impressions (the number of times that your site showed up in search results when users ran a search for that keyword)
- Click through rates or CTR (percentage of impressions that resulted in a click to your site)
- Average position of a particular web page on the search results page for that query.*
*Here’s an example from Google so you get a better understanding of what average position is and how it’s calculated:
“To calculate average position, we take into account the top ranking URL from your site for a particular query. For example, if Jane’s query returns your site as the #1 and #2 result, and David’s query returns your site in positions #2 and #7, your average top position would be 1.5.”
Below you are given options to filter your data by query (search term), by page, by country, by device (desktop, mobile and tablet), by search type (web, image and video) and by date. Let’s take a few examples so you can see how you can use filter your data to get some actionable information.
Say you want to find out how many people reached your site searching for a specific keyword, and compare desktop versus mobile search. Click on Queries and add your keyword, then click on Devices -> Compare Devices. Here you can choose to compare Desktop vs. Mobile. If you notice an increasing number of people visiting your site from mobile, it might be a good idea to plan for a responsive version of your site.
Here’s another example. Say you want to check and see how the average position of your top pages has changed over a specific period of time. To do that, make sure you tick the Position box, then click Pages to filter the URLs and only keep those you want to analyse. You can also choose a specific date range if you want to analyse the change over time. Now you can see the changes in position for your top pages. If you notice a big drop, you might consider making some changes and improving those particular pages.
Make sure you play around and see what other great insights you can get out of the Search Analytics report. You can also read Google’s guide on the Search Analytics report in case you need more information.
Links to Your Site

This section shows you which domains link to your site the most, what anchor texts are used by these sites that link to you, along with your most-linked-to content.
Why is this important? The more quality sites that link to your site, the better your Google ranking. On the other hand, if you’ve gotten an unnatural links warning, you should start analysing to find those low quality backlinks that need to be removed.
So if you want to do a backlink analysis on your site, if you want to optimise your content strategy or come up with a better link building strategy, this is where you should go.
Internal Links
In this section, you’ll see which of your pages you have linked to the most within your website. You can click on each of these pages to find out which pages link to it. Internal linking is important as it signals the importance of a page to search engines so make sure your product pages are the most linked to pages.
Manual Actions
Check this section if you detect a sudden drop in search traffic as it’s where you will find manual penalties that Google has applied to your site. You will probably also receive a site message if you’re penalised. Learn more about the types of manual actions and what to do about them.
3. Google Index
In this section you will find out more about the pages from your website indexed by Google.
For example, the Index Status section will show you a graph of how many of your site’s web pages are indexed in Google search.
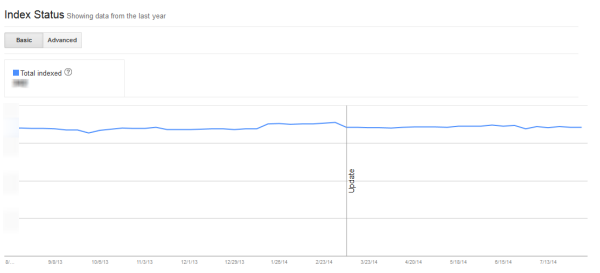
You should check this periodically as a loss of indexed pages may indicate a problem with your website’s robots.txt or potential penalties from Google.
In the Content Keywords section you will see a list with the most common keywords that Google crawler has found while navigating through your site. It’s important you keep a close eye on this list and see if unrelated keywords show up as that’s usually a sign that your site has been attacked and hidden keywords have been injected into your web pages. Google provides a useful guide with steps to recover in case you discover your site has been hacked.
In the Remove URLs section, you can request Google not to index specific URLs from your site. These can be private downloads, members-only content or maybe a blog post written by someone else who is now asking you to remove it (for example, a review of a product that is no longer being sold). So if there’s a link that you no longer want showing up in Google search, use this section to remove it.
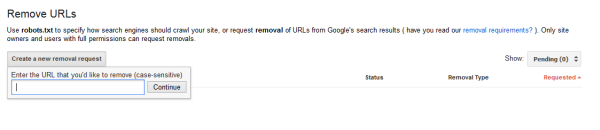
To remove a link, click “Create a new removal request” and then enter the URL that you want to remove and then follow the steps. Clicking Submit Request adds it to the removal queue and it may take a few hours until it’s processed. Also make sure you read this article that explains a list of scenarios for which URL removal tool should not be used.
4. Crawl
In this section you will find all of the things that Google sees when it crawls your site.
The Crawls Errors section will show you whether there are any issues with your website on a desktop or on a mobile device. For example, here is where you’ll see if there are any 404 ‘page not found’ errors which means that Google’s bot can’t find those pages. This sometimes happens when external sites link to pages on your site that don’t exist or that you’ve removed along the way.
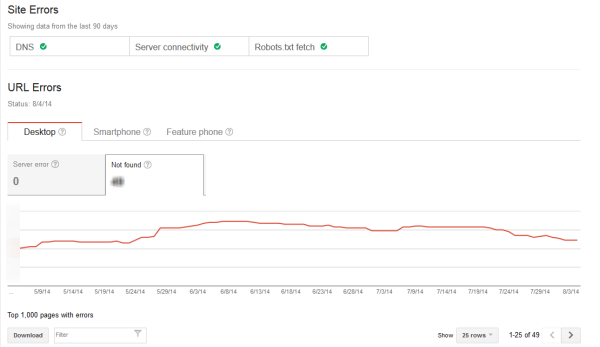
You will get a list of all the sites linking to dead pages on your site which you should use to email the site admins and ask them to change that link to a working page. You can also 301 redirect that old URL to a new one in case there are many sites linking to a specific dead page on your site.
In the Crawl Stats section, you’ll see Google bot activity on your website over the last 90 days. The crawl stats section gives you overview on:
- How many pages the bot has crawled – compare this number with your total number of pages to see if Google is crawling your entire site
- How many kilobytes the bot has downloaded to get a sense of how much data the bot has to process
- Time spent to crawl your site’s pages – based on how much data was downloaded the time might increase; if it takes too long it might mean that your website’s speed performance has been compromised.
The Fetch as Google section shows you how Google sees pages on your site, allowing you to check and ensure all parts of the content are getting indexed. It is also useful for submitting new URLs created on a site in order for Google to index them.
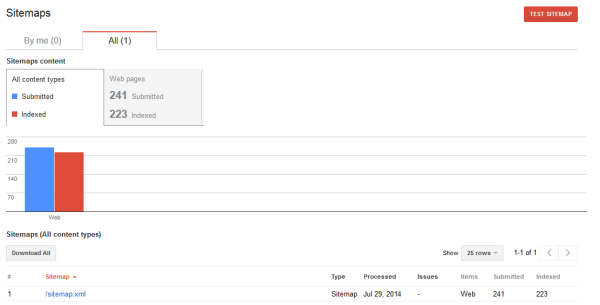
Use the Sitemaps section to submit sitemaps for your website to ensure that your content is being indexed properly by Google.
If you don’t know what a sitemap is, here’s a simple definition from Google:
“Sitemaps are a way to tell Google about pages on your site we might not otherwise discover. In its simplest terms, an XML Sitemap—usually called Sitemap, with a capital S—is a list of the pages on your website. Creating and submitting a Sitemap helps make sure that Google knows about all the pages on your site, including URLs that may not be discoverable by Google’s normal crawling process.”
Google provides a detailed guide on how to create and submit a sitemap so make sure you check it out.
In this section you will see the number of pages you have submitted to be indexed and the number of successfully indexed pages.
If pages are not indexed it may mean that they’re not linked from other pages where the crawler can find them. There are also other reasons for Google not to index certain pages such as thin content, duplicate content or just an overall low quality.
5. Security Issues
If Google detects any malware or other security issues on your site, this is where they’ll show it to you (apart from sending you a message). So if you see a page listed here, you need to get it fixed as soon as possible. Once you fix the issue, click on the “Request a Review” button to ask Google to review it again and don’t forget to also explain what actions you’ve taken to remove the threat.
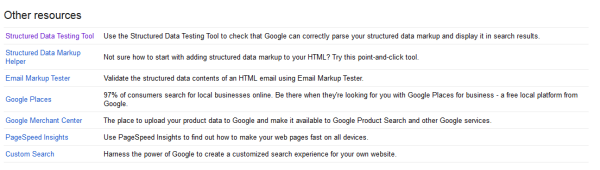
6. Other Resources
This section includes links to other valuable tools that are outside of GWT but still valuable to webmasters, such as Structured Data Testing tool, Google Merchant Center, PageSpeed Insights and more.
In conclusion
As you can see, Google Webmaster Tools is an extremely valuable tool for anyone from website owners and marketers to content creators. The detailed information it provides can give you insights into the effectiveness of your efforts as well as further ways to improve them. Hopefully this post has given you some ideas of how you can use Google Webmaster Tools to improve your site.
Your turn now
What data do you find most useful in Google Webmaster tools?


