A Beginner’s Guide to WordPress Plugins
WordPress is an incredibly powerful and easy to use Content Management System (CMS) for making amazing websites. By some estimates, over 45% of all websites online have been built using the platform.
One of the features that really makes WordPress stand out is its extensive ecosystem of plugins. With tens of thousands available, you can easily add almost any feature imaginable to your website. Plugins give you the flexibility to customise your site to perfectly match your needs — without ever needing to write any code. What’s more, the majority of these plugins are free to download and use.
We’ve put together a guide on how to install, activate, and uninstall WordPress plugins, plus a list of some of the most popular choices out there.

How do I install a WordPress plugin?
WordPress boasts a vast library of over 56,000 plugins, making it easy to add features like contact forms, image galleries, and social media feeds, all from your WordPress dashboard.
Want to create stunning visuals? Try plugins that add parallax scrolling effects or animated charts. Looking to boost your search engine rankings? There are plugins for that too, helping you optimise your content and track your performance. And if you’re worried about security, there are plenty of plugins to protect your site from hackers and malware.
The easiest and most popular way to install a WordPress plugin is directly from the official plugin directory within your dashboard. From there, installation only takes only a few clicks. We’ll go over that approach first. If you need to download a plugin file direct to your device and then upload it to WordPress, that’s easy, too, and we’ll follow up on that just after.
How do I install a plugin direct from the plugin directory?
Start by accessing your Managed WordPress dashboard. For info on how to do this, please read our Support article: How do I access my Managed WordPress dashboard?
To add a plugin, simply navigate to the “Plugins” section and click “Add New.” You can then search for the desired plugin by name or browse through categories.
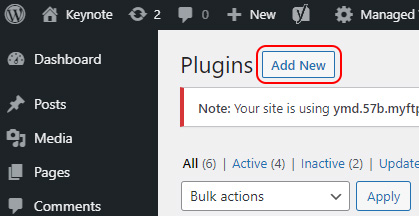
Use the search bar to find the plugin you want to install. You can search by name, category, or functionality. Once you’ve found it, click the “Install Now” button.
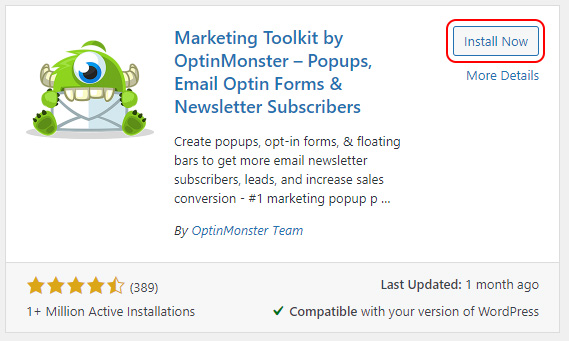
After installation, click the “Activate” button to start using the plugin. Easy!
WordPress makes it easy for you to “activate” or “deactivate” plugins to give you more control and flexibility, without having to uninstall each and every time. This way, you can install multiple plugins at once but activate them one by one to test their compatibility or troubleshoot any issues.
How do I install a plugin that I’ve downloaded to my computer?
You can find WordPress plugins through sources other than the official WordPress Plugin Directory. This isn’t recommended, though — as it’s usually best to stick with the official directory, where plugins are vetted for security and compatibility with all WordPress versions.
However, some developers sell their own premium plugins exclusively through their own websites rather than through the official directory. That’s one case where it might be necessary to download to your device first.
If you’d like to go ahead and install a plugin from your device, you can follow these steps:
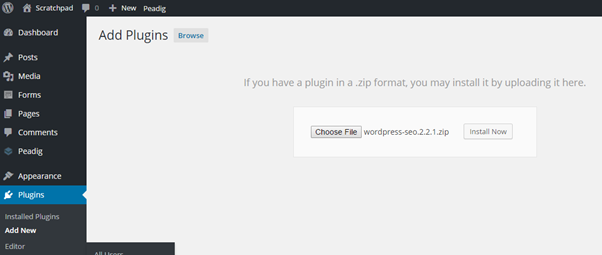
First, log into your WordPress admin area and choose the Plugins options. From here, click “Add New”. Click the “Upload Plugin” button at the top of the page.
Select “Choose file” and find the plugin you’d like to upload from your system.
WordPress plugins are uploaded as ZIP files that packages all the plugin’s code, assets, and other necessary files into a single compressed file. Once you’ve found your ZIP file, install it to WordPress by clicking Install Now.
Let the plugin install. Once you’ve done this, click Activate Plugin for the plugin to be added to your site.
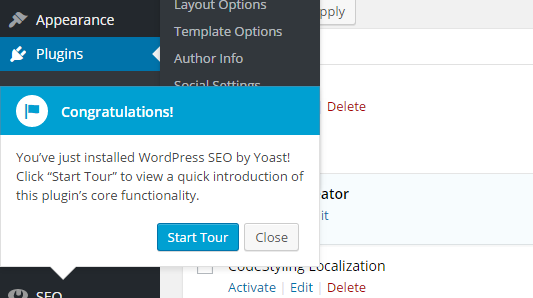
You’ll see a confirmation that the plugin has been installed and a prompt to a tour to give you more information of how to use the plugin and its functionality.
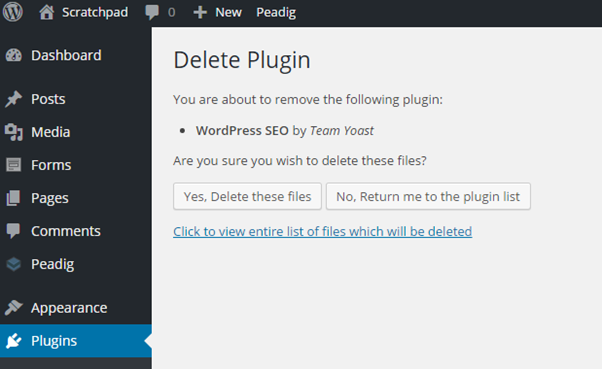
If you’ve chosen and installed a plugin but changed your mind or found something better, you can also remove a plugin as easily as you installed it. You can either deactivate the plugin by finding it in your admin list and clicking deactivate, or if you want to remove it completely, click delete and confirm your choice by clicking ‘Yes, Delete these files’.
Note: Some plugins require additional setup after activation. Be sure to read any included instructions or documentation for those plugins. If there are plugins that require more backend activity when it’s installed, these will often be accompanied with installation instructions.
How do I update a WordPress theme or plugin?
Start by accessing your Managed WordPress dashboard. From there, select Updates. Here you will see a list of your plugins and themes that require updating.
You can either update each one individually or you can select them all and update them at once by using the tickboxes provided. Simply click the respective Update button to start the process.

How do I deactivate a WordPress plugin?
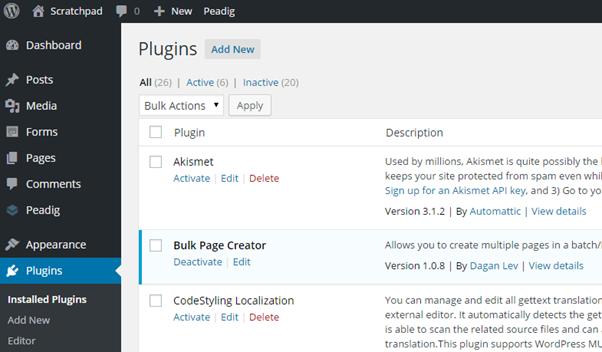
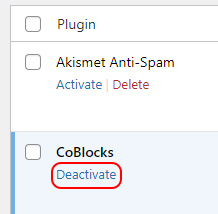
To disable a WordPress plugin, start by logging into your WordPress dashboard. On the left-hand menu, click on “Plugins” to view a list of all your installed plugins.
Locate the plugin you want to deactivate (we’ve selected the “CoBlocks” page builder plugin just as an example below), then click the “Deactivate” link located directly below the plugin’s name. WordPress will instantly disable the plugin and you’ll get a confirmation message.
Remember: deactivating a plugin doesn’t delete it; it simply turns it off temporarily. You can always reactivate it later if needed.
Popular WordPress plugins
If you’re not sure where to begin when choosing new plugins, we have listed some of the best and most popular WordPress plugins that act as invaluable extensions to the WordPress CMS platform.
WordPress SEO by Yoast
The first plugin that we recommend you download for any type of website is the WordPress SEO plugin from Yoast. This plugin helps you to optimise the content of your site, making it easier for users to find. WordPress SEO enables you to edit your meta titles and descriptions, structure your website's sitemap, connect your site to your social media profiles and control your RSS feed so that your content is not plagiarised. This plugin is not only important for the content of your site for search engine, but also for users.
Google Analytics by Yoast
The next plugin we recommend is also made by Yoast. Yoast's Google Analytics plugin is the logical step forward after installing WordPress SEO. Now that you have optimised your site's content, it’s time to see how this translates into users visiting and interacting with your content. This plugin gives you visibility of your site's key analytics such as page views, number of sessions/visitors, how many of these were organic, and the site's bounce rates. You can use these insights to highlight opportunities to modify and improve areas of your site.
W3 Total Cache
One of the factors that affects how your site ranks is page load speed. Thankfully there’s a plugin that’s dedicated entirely to WordPress performance optimisation. W3 Total Cache provides a number of features including file minification to reduce download times and content delivery network support that can improve the overall user experience, as well as page speed.
Gravity Forms (paid)
http://firecask.com/go/gravityforms/
If you want to provide users with the ability to contact you or add content to your site, Gravity Forms is the plugin for you. This contact form plugin enables you to add and remove a variety of contact forms and gives you control over the content of these forms. You can incorporate all sorts of forms from contact request forms, questionnaires, to forms enabling content to be uploaded to your site by users.
WordFence
If you want to increase the security of your site, the WordFence Security plugin can help make your new site faster and more secure. This security and performance plugin initially starts by checking whether your site has already been infected, and then secures your site.
Social Structured Data (paid)
http://peadig.com/wordpress-plugins/social-structured-data/
When someone shares a link pointing to your website, each social network uses something called social structured data to set a custom title, description and thumbnail. Twitter, Facebook and Google+ do automatically choose it for you, but if you want to customise this then the Social Structured Data plugin is for you! Once you activate, a box is added when you add or edit. Any new page or post so you can set your own data just for social networks!
Simple URLs
Simple URLs is a great way to manage and track any outgoing links from your site. You can set as many shortcuts as you wish, and you can view all stats within the WordPress backend. This is really handy if your site features affiliate links, you can monitor the conversion rate as you can see how many clicks these links get as well as the number of sales those clicks resulted in.
Akismet
We all want users to interact with our site, but there are a growing number of spammers (both real and automated) who use features such as the comments section of your site for spam. The Akismet plugin is the simple solution to this. The plugin has the ability to check comments made on your site to verify whether or not the comment is in fact spam. Just in case a comment looks like spam, the plugin gives you the option of moderating the submission on the backend admin screen. By highlighting potentially hidden or dangerous links, this plugin can save you time and security risks.
JetPack
The final plugin in our list is JetPack. This particular plugin unlocks a whole host of handy features such as the ability to install and update multiple plugins at once, as well as enhancing your site's performance and usability. JetPack allows you to customise your site with features such as carousels, sidebar widgets and tiled galleries, it can enable your site to be responsive on phones and tablets (this is now a ranking factor for Google), you can control various aspects of your content, enhance visitor engagement and improve the site's overall performance.
How to choose a new plugin
These are just a small selection of the handy plugins that can help a beginner to take their site to the next level, but once you start looking through plugins you’ll soon realise that there are loads to choose from. As each plugin description will say that it does everything you want and more, how do you decide which is the right plugin for you?
Below we have listed some handy hints and tips on finding plugins that are not only trustworthy, but also safe.
The WordPress Directory
In the same way that you would use TripAdvisor to find out about a destination before you book, the WordPress plugin directory is a trustworthy resource for finding free plugins. The directory is reliable as it’s regularly monitored by a team of dedicated contributors.
How many times has it been downloaded?
It may seem too simple to be true, but taking a look at the number of times a plugin has been downloaded is a good indicator to its functionality. Although a new plugin may have only been downloaded a limited number of times, a more established plugin will have been downloaded hundreds of thousands of times.
What do other people think?
As well as the number of downloads, it’s also worth looking at the reviews. As the reviews are submitted by registered users you can see what they really think of a plugin after they have used it. The ratings are normally between 1 and 5 so if a plugin has been given low scores take a look at the comments to find out why.
Are there any issues?
The great thing about plugins listed in the WordPress plugin directory is that they each have their own support area. Here you can see whether other users have highlighted issues and the status of the issue. It could be that some plugin shave ongoing problems, but the ones to trust have either resolved any issues that have been brought to light, or they are working on fixing the bugs.
When was the plugin last updated?
If there have been bugs that have been remedied, there will no doubt be a new version of the plugin. Also, as technology advances, so do the capabilities of many plugins. A good thing to keep in mind when looking for plugins is the number of versions it ha. For example, if a plugin hasn’t had an update in the past couple of years it may not be compatible with the most recent versions of WordPress.
We hope that this has given you an idea of the possibilities plugins can open up for your new WordPress site, as well as what to look for when searching for new plugins. If you have any questions, feel free to get in touch in the comments section below!
This article was written by Kat Kynes of Manchester SEO agency FireCask.