

Facebook has 829 million active users a day – so it’s clearly a place where your business can find customers. But cutting through the noise can be hard. Even if your company already has a well-established Facebook Page, changes to the way the social network displays your posts to people who have liked your page means that you’re only going to reach a fraction of your potential audience.
That’s why learning how to run a successful Facebook ad campaign is crucial – it allows you to reach existing customers and attract the attention of new ones. In this post we’ll look at everything from establishing a Facebook Page in the first place to how to run and monitor a successful Facebook ad campaign.
How to use this guide
This guide has been designed to allow you to quickly assess what you want to get out of Facebook ads and then find the advice that’s right for you.
The first section deals with setting up a Facebook Page, so start there if you don’t already have one.
After that, there’s a four step process to launching your first campaign: 1) Decide what kind of ad is right for you. 2) Set up the basics of the ad. 3) Select the audience you want your ad to target. 4) Set a budget and launch the campaign.
The table of content below will set you on the right track and links throughout the piece will allow you to find the next relevant section with ease.
Table of contents
I want to set up a Facebook Page for my business
I want to learn about the different kinds of ads offered by Facebook
I want to create a Page Post Engagement ad
I want to create a Page Like ad
I want to create a Clicks to Website ad
I want to create a Website Conversions ad
I want to create an Event Responses ad
I want to create an Offer Claims ad
I want to learn about audience targeting for my ad
I want to learn about setting a budget for my ad
I want to see how my ad has performed
Setting up a Facebook Page for your business
If you haven’t already done so, you need to create a Facebook Page for your business. This page is where you will communicate with customers, and differs from the standard Facebook Profile that you will have set up as an individual.
The chances are you’re already familiar with Facebook Pages, even if you don’t realise it. If you’ve “liked” a brand or celebrity, then you’re actually liking their page.
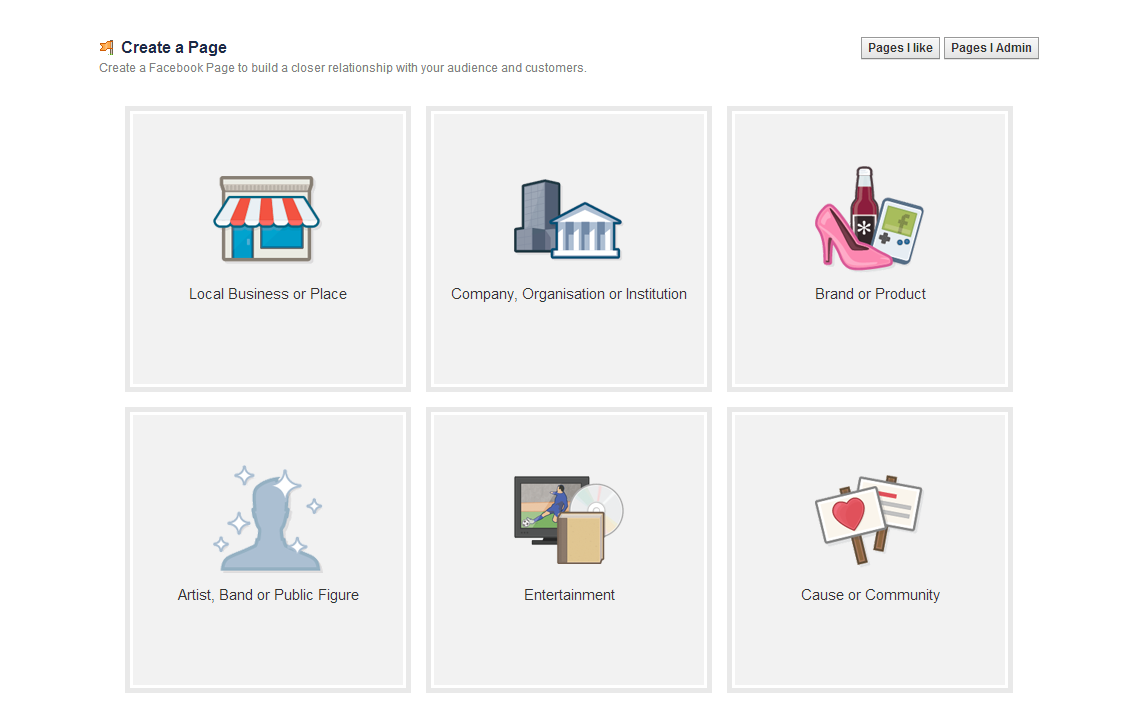
Creating a page is straightforward – click here to begin the process (you’ll need to be logged in to Facebook). The first step is to select a category. The chances are either Local Business or Place or Brand or Product will be most suitable, but opt for the one that’s most relevant to you and your business.
Once you’ve done that, it’s a case of entering basic details about your business. It’s important that these details are accurate as people will want to know how they can get in touch with you online and offline.
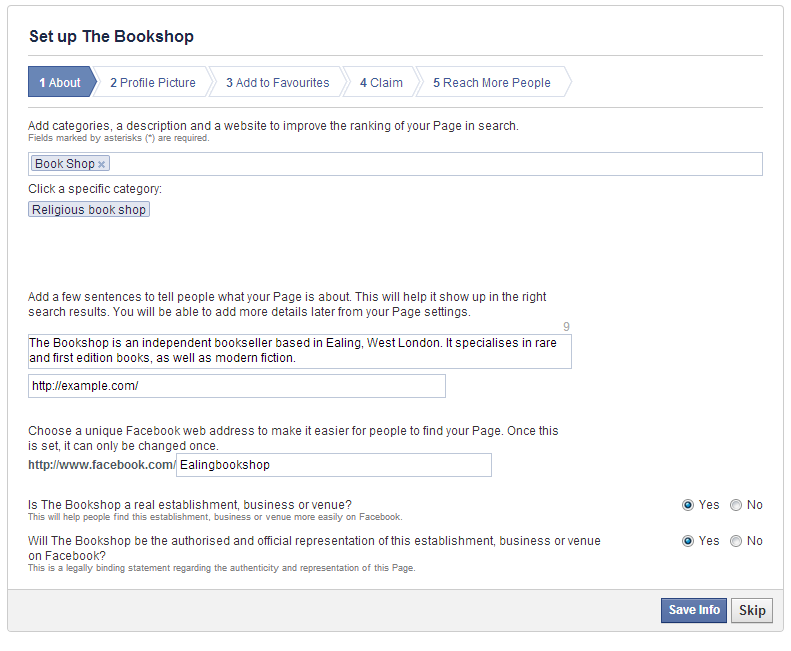
The next step is to add more details about your business/brand. Make sure that the information you input is not only relevant, but also descriptive – this data is used when people search for Facebook Pages, so you need to give some consideration to the phrases people will use when looking for businesses like yours.
In this example, you can see how our hypothetical bookshop’s description features both its location and the kind of stock it handles. Not only will this allow people to see at a glance what they can expect for the shop, it should also make it easier for people searching for it to track it down.
You also need to ensure your Facebook Page URL is short and descriptive. Try your business name initially, and if that’s taken try a combination of business name and location.
The next step is a profile picture. You have a few options here – either a logo, a photo of your shop, or a photo of your staff. Just make sure that whatever it is includes your company name as this is an important piece of branding.
Next, you can add the page to your favourites – this is purely to help you navigate to it more easily when logged into your Facebook account.
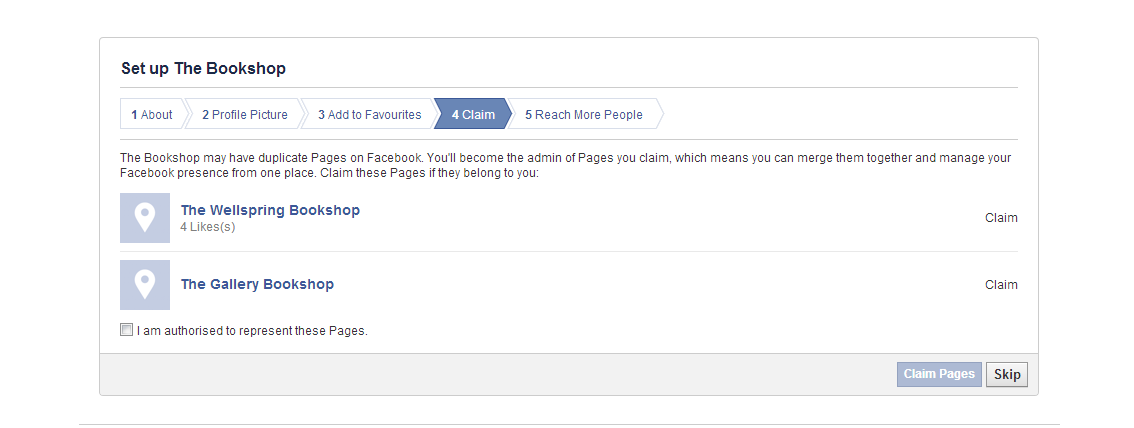
Facebook will then give you a chance to claim any duplicate pages. This allows you to take control of any pages that may have been set up for your business by people other you. In most cases though, there won’t be any.
Finally, you’ll want to add a payment method. This will allow you to pay for the adverts you run.
Once you’ve done that, your page is ready to go. There won’t be much to see there for now, but given a bit of time it should start to look something like this.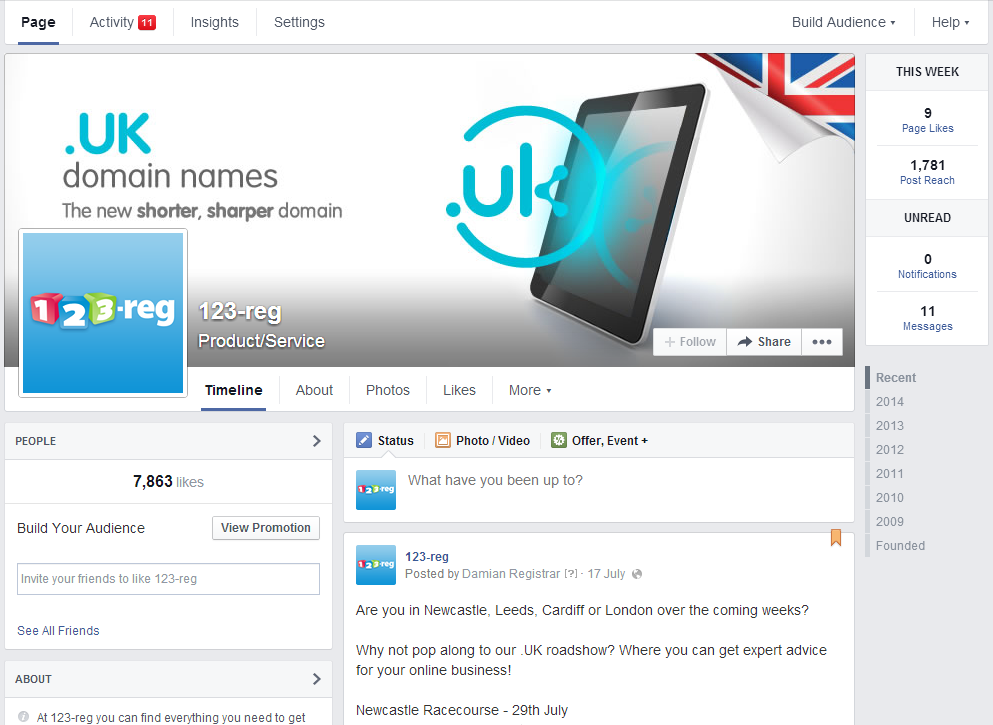
The next step is to look at the kinds of ads offered by Facebook and the different benefits they offer. Alternatively, you can return to the table of contents.
Deciding what kind of ad to run
In this section, we’ll look at the kinds of ads Facebook offers and what they can be used for. In order to pick the right kind of ad type, put some thought into what you want to achieve with your campaign. That way, you’ll be able to identify the right option more easily.
After we’ve looked at the ad types, we’ll go into more depth as to how to set up each a particular campaign, but for now let’s just look at the basics. NB: We won’t look at how to set up App Installations and App Engagement ads, as these don’t make for good first Facebook ad campaigns.

Advert types in brief
Page Post Engagement
Good for: Boosting the number of likes, comments, shares etc a particular post on your Facebook Page has received.
Use it for: Telling people about special offers, or boosting the impact of already popular content
Page Likes
Good for: Increasing the number of likes your Facebook Page has.
Use it for: Letting potential fans know that your page exists and that they can like it to get updates on offers, deals, etc.
Clicks to Website
Good for: Attracting visitors to your website.
Use it for: Encouraging people to visit specific pages on your website, such as interesting content.
Website Conversions
Good for: Encouraging people to visit your website and take a certain action
Use it for: Encouraging people to buy from you, or sign up for a newsletter.
App Installations
Good for: Encouraging people to install your app
Use it for: Getting people to install your app
App Engagements
Good for: Encouraging people to interact with an app they have already installed.
Use it for: Getting people to interact with your app.
Event Responses
Good for: Letting people know about events you’re hosting
Use it for: Boosting the number of people attending your events
Offer claims
Good for: Promoting Facebook offers you’ve created
Use it for: Promoting Facebook offers
Once you’ve decided what kind of advert best meets your needs, you can either get started creating a Page Post Engagement ad, a Page Likes ad, a Clicks to Website ad, a Website Conversions ad, an Event Responses ad, or an Offer Claims ad. Alternatively, you can return to the table of contents.
Creating a Page Post Engagement ad
- Select the Page Post Engagement ad type
- Assuming you only have one Facebook Page, you will now be asked to pick a post to promote. If you have more than one Facebook Page, you will be asked to select a page first.
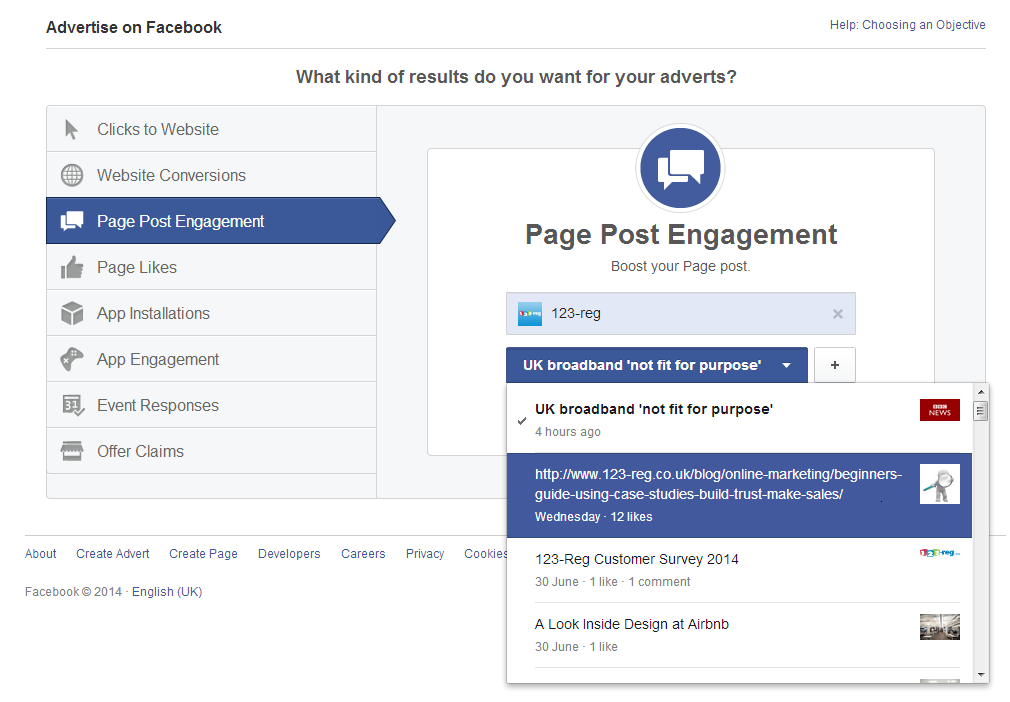
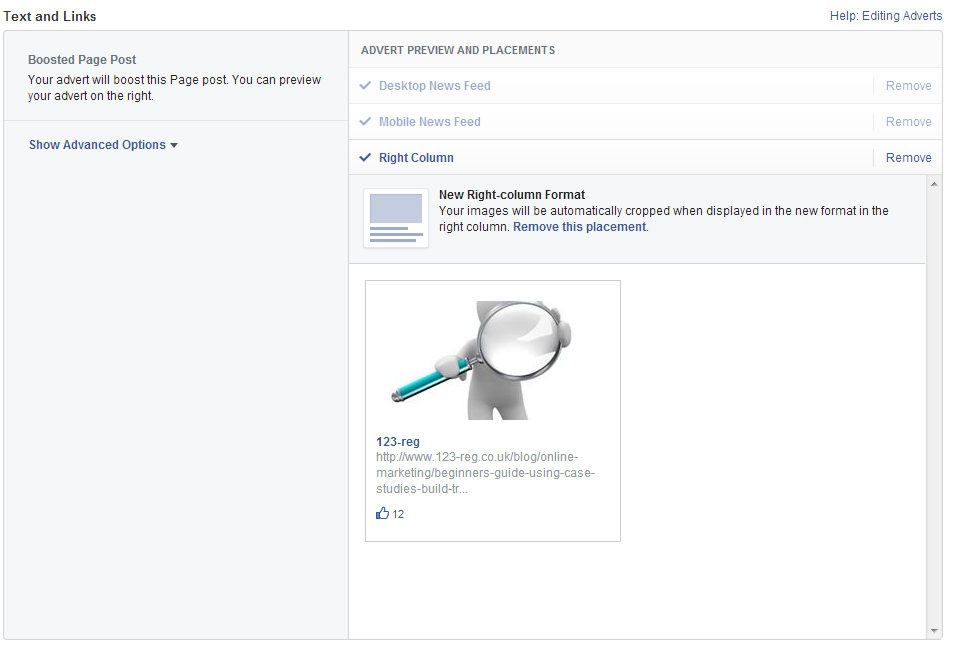
- Next you need to decide where the advert will appear. For your first ad, you’ll probably want to leave Desktop News Feed, Mobile News Feed and Right Column selected. Once you’ve got an idea of which kind of placement works best for your content, you can adjust these settings in the appropriate manner. You can also see how the promoted post will look by clicking on the name of the relevant placement. In the image below we’re previewing the Right Column version of the ad. Here you can see that our image looks poor, so we may want to deselect the Right Column option.
Optimisation tips
Don’t select the mobile option if your post promotes content that doesn’t work properly on mobile.
Make sure you use high quality images when posting Facebook updates, as these will be prominently displayed when you promote the post.
Once you’ve got the ad looking how you want it, you can move on to selecting the audience that will see your advert.
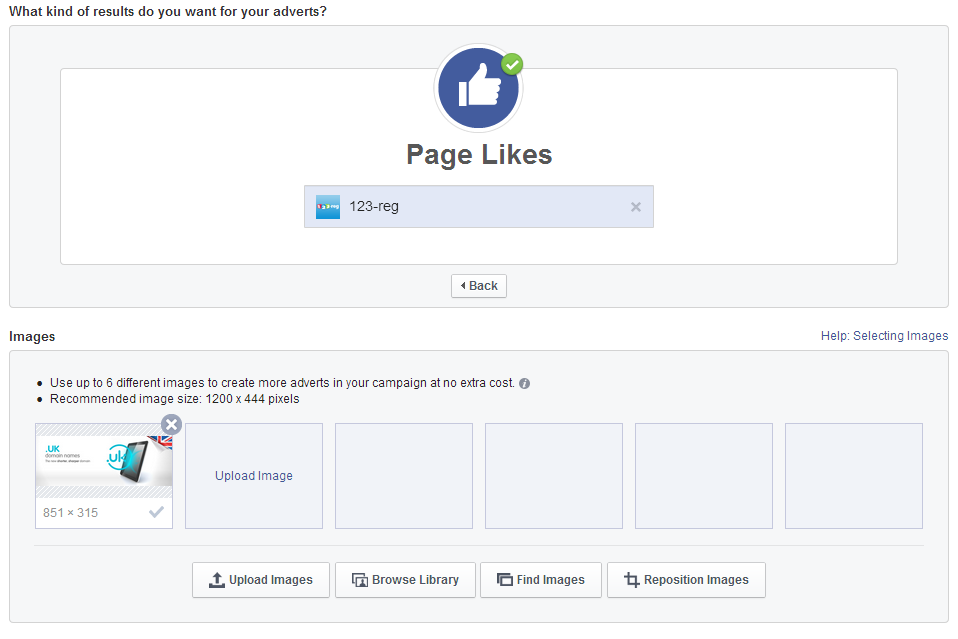
Creating a Page Like ad
- Select the Page Like ad type and, if you run more than one Facebook Page, the Page you want to promote.
- You now have the option to upload six different images. This creates a range of adverts for your campaign at no extra cost.
- Next, you need to write some text for you ad. Focus on the benefits that people will get by liking your page. In the example below, you can see we’ve pushed the fact that our Facebook Page will carry details of offers we may run in the future.
- You probably won’t need to do anything with the Advanced Options. The “headline” will only appear in right column ads and in most cases you’ll want everyone who visits your Facebook Page via the ad to see your Timeline first.
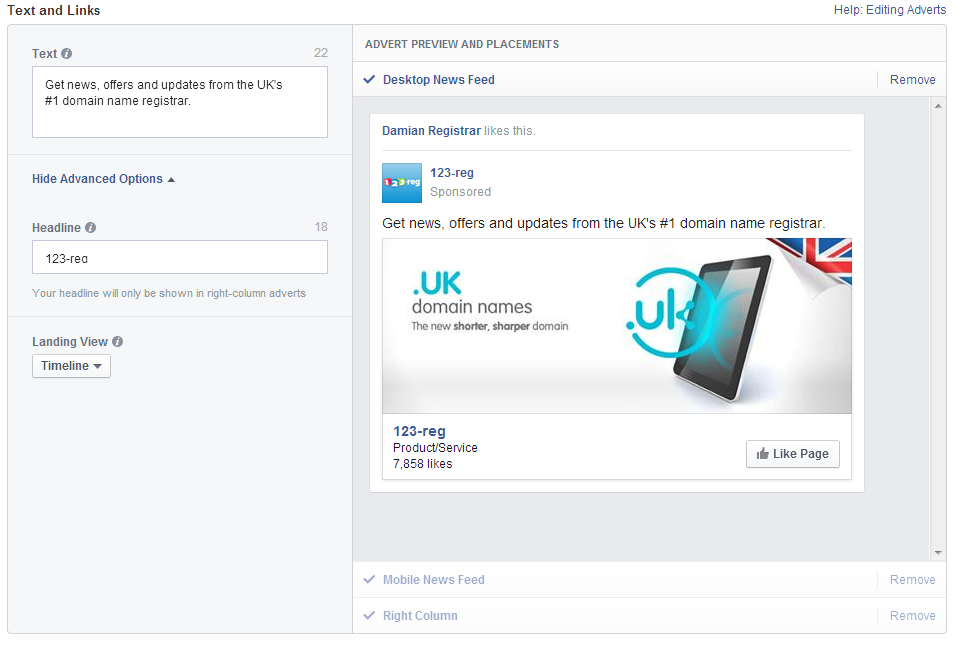
- Now use the preview function to see how your ads will look and make any required changes.
Optimisation tips
- Make sure you use images that comply with the recommended dimensions of 1200 x 444 or you ads may not display properly
- Use multiple images to see which resonates best with your target audience
- Once you’ve got the ad looking how you want it, you can move on to selecting the audience that will see your advert.
Setting up a Clicks to Website ad
- Select the Clicks to Website ad type and enter the URL you want to promote. The chances are you’ll want to focus on a specific piece of content such as a blog post or special offer, rather than just your homepage.
- You now have the option to upload six different images. This creates a range of adverts for your campaign at no extra cost.
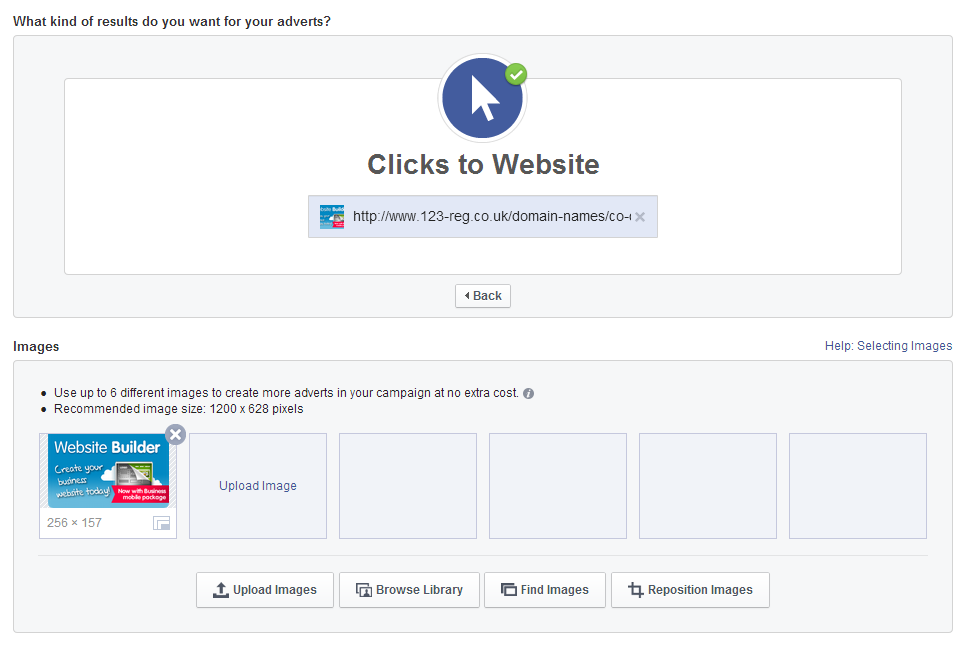
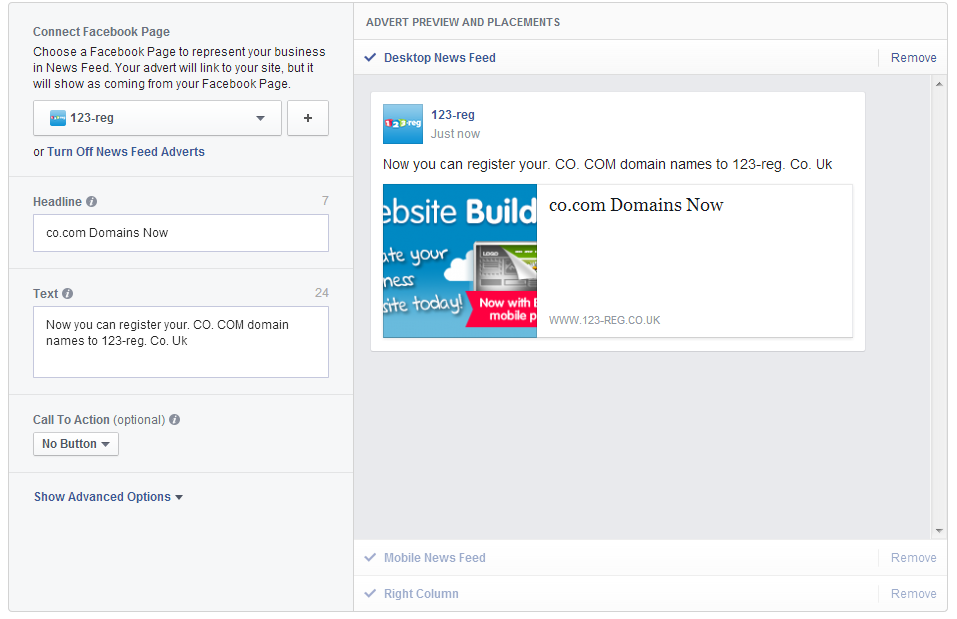
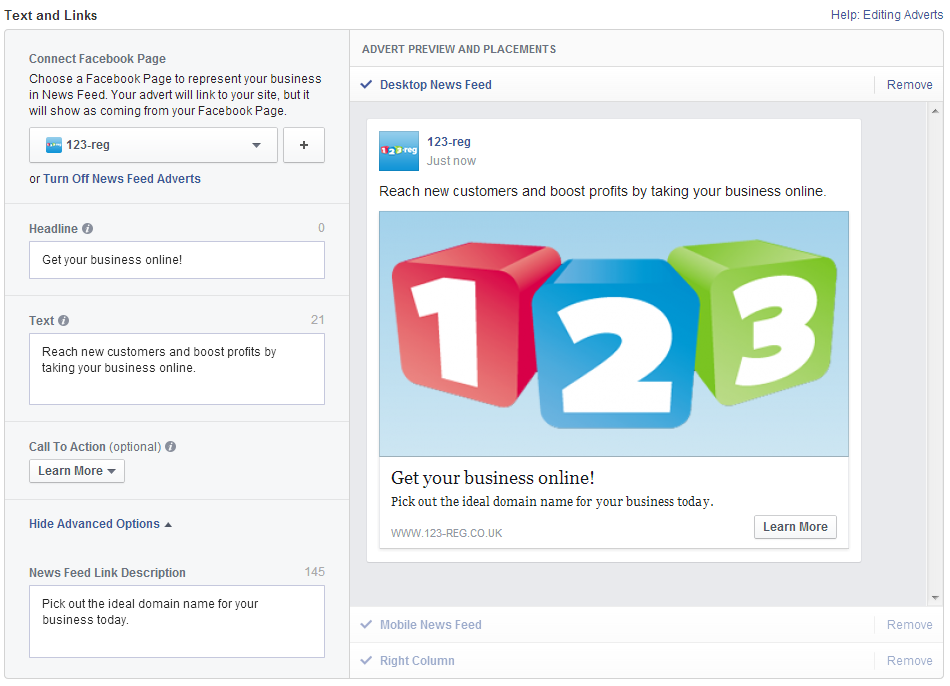
- In order to have your ad appear in newsfeeds, you have to connect it to a Facebook Page. Simply select the page belonging to the site you’re promoting. In this case, we’ve selected the 123-reg Page.
- Next you need to right a headline and some text for your ad. You don’t have much space, so concentrate of the benefits people will get by visiting your website.
- You should also pick a call to action button if appropriate.
- Add a News Feed Link Description. As you have limited space in the Headline and Text fields, it’s important to make the most of the extra field provided when your ad appears in news feeds. Be descriptive and tell people what they stand to gain from visiting your website.
- If you’ve set up a tracking pixel, you may want to add it here. You can read how to set up a tracking pixel in the Website Conversion ad section. But if you don’t have one, don’t worry.
- Next, preview the ad in its various forms and make sure everything looks how you want it.
Optimisation tips
- Make sure you use images that comply with the recommended dimensions of 1200 x 628 or you ads may not display properly (as can be seen in the above example).
- Use multiple images to see which resonates best with your target audience
- Once you’ve got the ad looking how you want it, you can move on to selecting the audience that will see your advert.
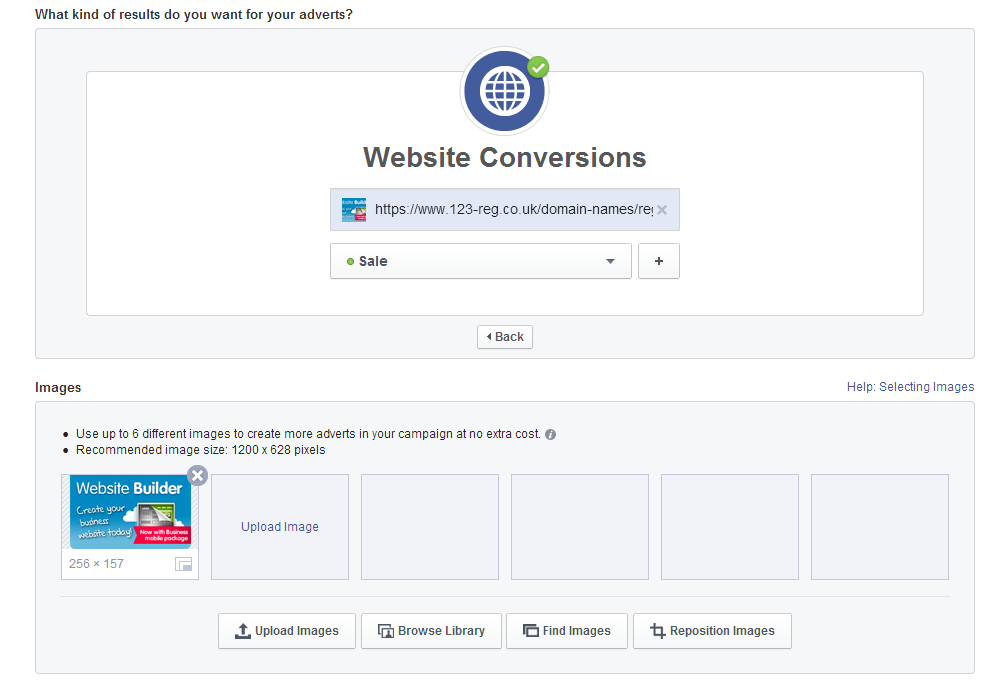
Creating a Website Conversions ad
- Select the Website Conversions Ad type and enter the URL of the website you want to promote
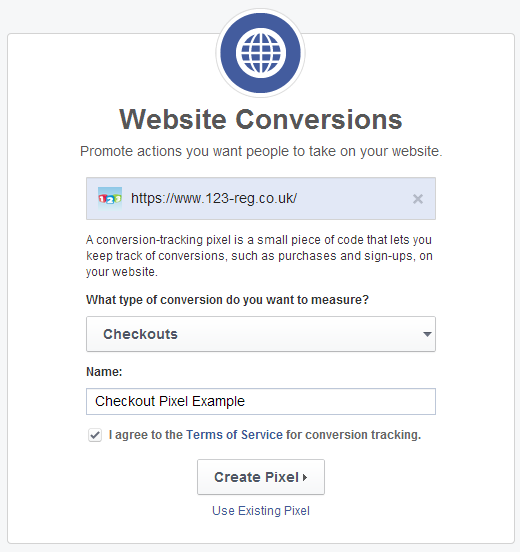
- If you haven’t already created a conversion pixel, you’ll need to do so now. First, select the type of conversion you want to track and then give the pixel a name.
![]()
- Although creating the pixel is straightforward, adding it to your site does require some technical knowledge. Once you’ve created the pixel, you can either access the code and add it to your site, or email it to someone and have them do it for you. It’s vital you place the pixel on the right page – for example our Checkout pixel should go on the page which confirms someone has made a purchase. If it is placed anywhere else, it would report incorrect data.
- You now have the option to upload six different images. This creates a range of adverts for your campaign at no extra cost.
- In order to have your ad appear in newsfeeds, you have to connect it to a Facebook Page. Simply select the page belonging to the site you’re promoting. In this case, we’ve selected the 123-reg Page.
- Next you need to right a headline and some text for your ad. You don’t have much space, so concentrate of the benefits people will get by visiting your website.
- Add a News Feed Link Description. As you have limited space in the Headline and Text fields, it’s important to make the most of the extra field provided when your ad appears in news feeds. Be descriptive and tell people what they stand to gain from visiting your website.
- Add the most appropriate call to action.
- Next, preview the ad in its various forms and make sure everything looks how you want it.
Optimisation tips
Make sure you use images that comply with the recommended dimensions of 1200 x 628 or you ads may not display properly
Use multiple images to see which resonates best with your target audience
Once you’ve got the ad looking how you want it, you can move on to selecting the audience that will see your advert.
Event Responses ad
- If you’ve already set up an event and would like to promote it, you can skip to the fifth bullet point in this list, if not follow all the steps.
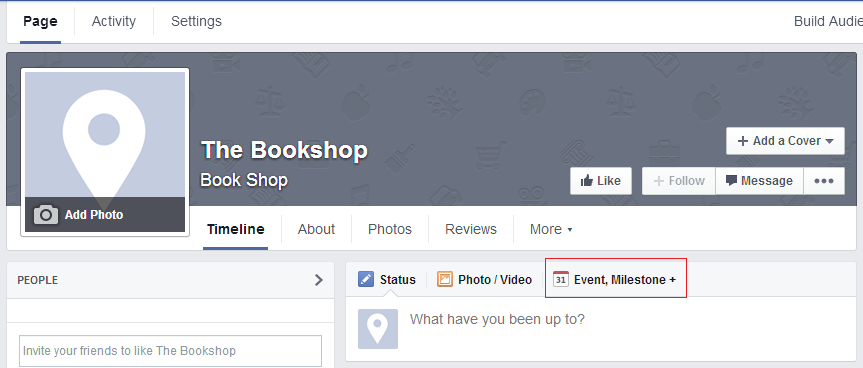
- Click the events icon on located at the top of your Facebook Page’s timeline.
- Enter the relevant details of your event including the date and time, and a description of the event. Remember, people will look at the description of your event when deciding whether to attend, so be persuasive.
- The event will automatically be displayed to people who have liked your page. You can target a specific demographic within your followers by using the targeting options. When you’re happy, click create.

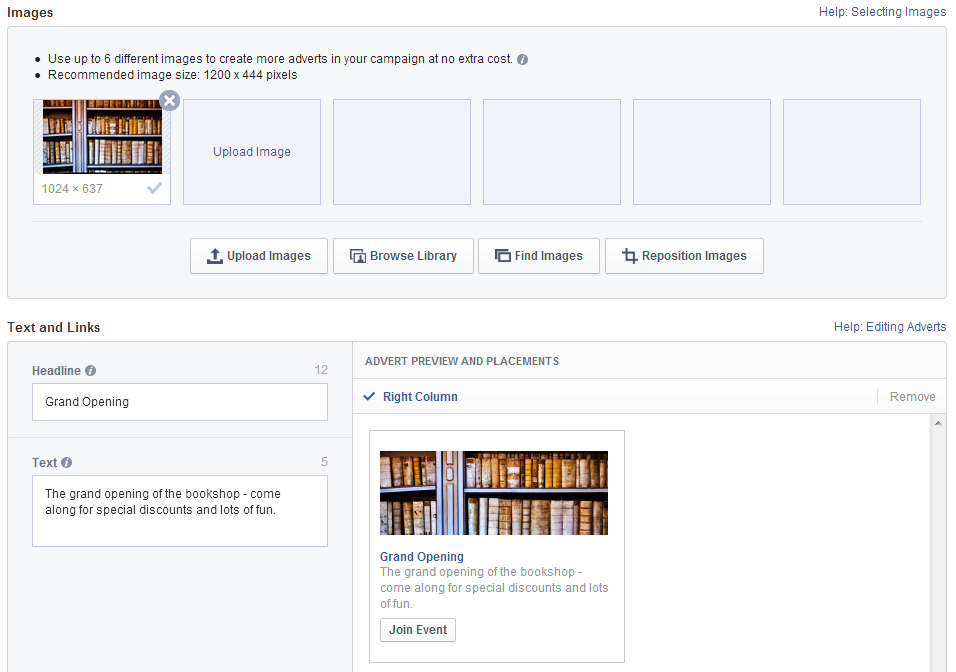
- You can now expand the reach of your event by promoting it using the related ad option. Go to “create adverts” and select Event Responses. If you have more than one forthcoming event, select the one you want to promote.
- Next, you have the option to add up to six images to your ad. This allows you to create different versions of your ad at no extra cost.
- The headline and text fields will be prepopulated with the name and description of your event. Make sure you’re happy with what’s in there and preview your ad.
Once you’ve got the ad looking how you want it, you can move on to selecting the audience that will see your advert.
Creating an Offer Claims ad
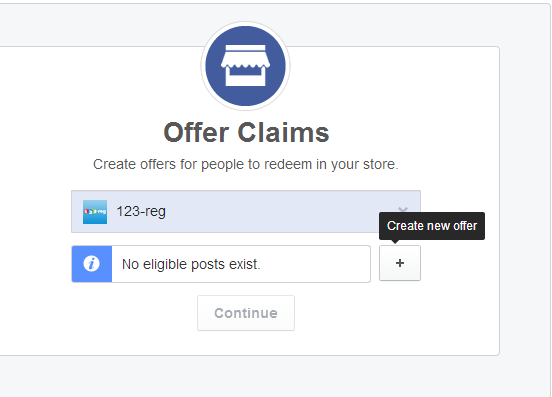
- Select the Offer Claims advert type and the page which will issue the offer you want to promote.
- Select the offer you want to promote or, click the “+” button to create a new one.
- If you’re creating a new offer, you’ll need to add an appropriate title, description and image. The aim here is to make sure people can see at a glance exactly what deal you’re providing.
- Set an expiry date for your offer. If you want to limit the number of people who can claim your offer, do so by selecting the claims limit button and entering the relevant figure.
- If your offer is online, you need to include a link to the page on which the offer can be found. You may also want to include your terms and conditions.
Once you’ve got the ad looking how you want it, you can move on to selecting the audience that will see your advert.
Audience targeting
Facebook offers a range of targeting options which, if used properly, will allow you to ensure your ads reach the most relevant audience. In this section, we’ll look at adding targeting to a campaign you’ve already prepared by working through one of the above sections. Targeting is the same for all types of ads, so after you’ve done it once, you’ll know what to expect the next time. Here’s what’s on offer.
Custom audiences
Custom audiences allow you to target people based on their email address, Facebook ID , phone number or app user IDs. In order to make use of them, you must have a list containing the relevant data of the people you want to target.
You can also use the custom audience pixel to target adverts at people who have visited your website. These are advanced options, so you’re unlikely to use them during your first few campaigns.
However, they can be extremely useful. For example, you could use an email address to target a Page Like campaign at people who have done business with you, but haven’t liked your Facebook Page.
For now though, you’ll probably want to stick to the standard targeting options.
Locations
You can target people in locations as wide as whole countries or as specific as a town or district. Make sure you only target locations where you can realistically expect to do business. It makes sense for 123-reg to target the whole of the UK, but for our hypothetical bookshop in Ealing promoting posts to people in Ayr, Scotland is likely to be a waste of money.

Age
If your business or promotion appeals to a certain age group, use this option to ensure your Facebook ads are only displayed to members of that age group. For example, the 123-reg terms and conditions state that only people 18 and over can have an account with us, so we wouldn’t want to show ads to people younger than that.
Languages
One of the most straightforward options – just pick the languages used by the people you’re trying to reach.
More demographics
This section allows you to target very specific categories of people, such as those in a relationship or people who have certain jobs. Our hypothetical bookshop could use it to target expectant parents if it was running a campaign based around early years reading.
Interests
Use this section to target people based on the subjects that interest them. It’s a straightforward concept, although there are plenty of options to pick from. Be as specific as possible – if our bookshop was running a promotion relating to science fiction novels, it would make sense for it to target people who are interested in that particular genre, rather than just reading in general.
Behaviours
Use this to target people based on certain activities. This is the category you’ll probably use least often but it can come in handy. For example, if the Bookshop was running a campaign relating to travel books it could target people planning to travel.
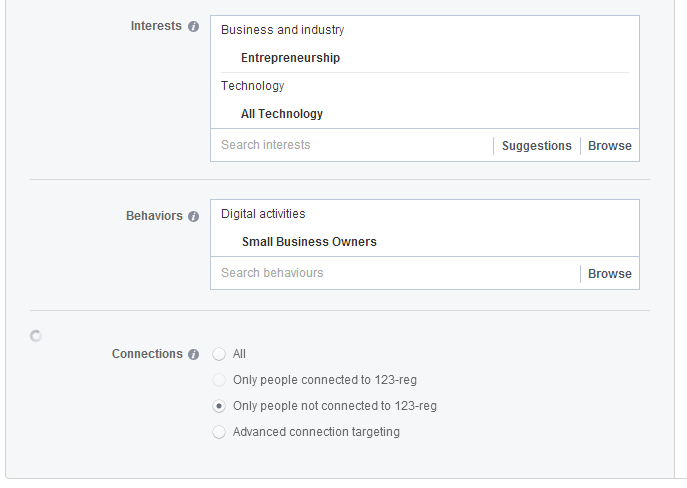
Connections
Finally, we have the connections option. We’ll take a look at each of the different targeting methods.
All: Targets Everyone, regardless of whether they have liked your page or not.
Only people connected to [Your page]: This only targets people who have liked your page. As your Facebook Page posts don’t get shown to everyone who has liked this page, you can use this option to help make sure people who have liked get the message.
Only people not connected to [Your page]: This only targets people who have not liked your page. Use this to make sure you’re reaching a new audience, rather than people who are already aware of your business.
Advanced connection targeting
Include people who are connected to: Use this field to target people who are connected to a certain page, app or event you have created. For example, if our bookshop was holding a special event, we could create an ad that targeted people who have indicated they will be attending the event via Facebook.
Exclude people who are connected to: The opposite of the above option.
Include people whose friends are connected to: Use this to target people whose friends have already liked your page.
Audience definition
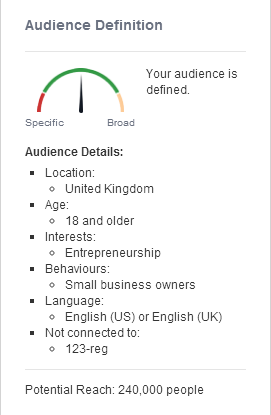
This tells you how many people are in the target audience you have selected. The broader the audience, the more money you will need to spend to reach everyone. If your audience is too narrow, you will struggle to attract likes, comments, etc as not enough people will see the campaign.
Once you’re happy with the audience you’ve selected, you can move on to setting a budget using the campaign pricing section.
Campaign pricing
Finally, you need to decide how much you want to spend on your ad. Budgeting is straightforward and as long as you know what you’re doing, you won’t end up with any nasty surprises when your campaign is over.
Campaign:
This tells you the name of the campaign you have created. You can rename it, or switch to a different campaign.
Ad set name:
The name of the advert you have created. Choose something that describes the target audience, the period you’re running it for or the adverts you have created. You can have more than one ad set per campaign and you can reuse ad sets you have created in the past.
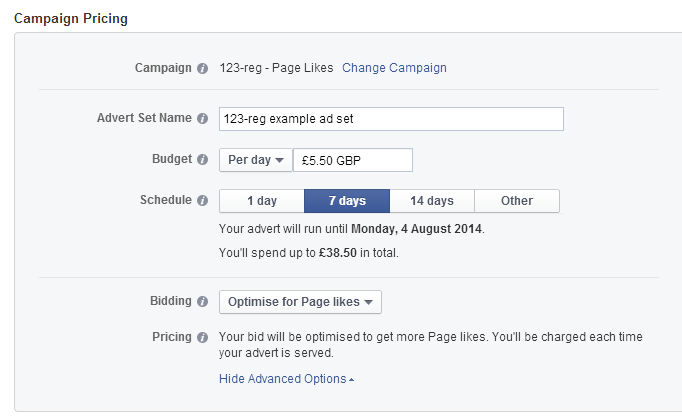
Budget:
How much you will spend on your campaign. You can either set a total budget, which is the absolute maximum you will spend, or a daily budget. If you go for the latter option, your maximum budget will be your daily budget multiplied by the number of days you run the campaign for.
Schedule:
Use this to set a time period for the ad. If you want to select a specific start and end date, use the “other” option.
Advanced options:
It’s unlikely you will want to change this, even if you are experienced in creating Facebook campaigns. On the default settings, bidding will be optimised to suit the kind of ad type you have created.
Estimated daily reach
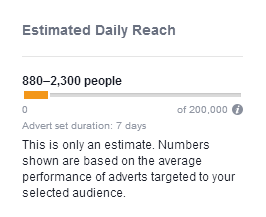
This is how many people Facebook estimates will see your ad each day based on your targeting and budgeting options.
Once you’re happy with everything, you can review your ad and then place your order. Your ad will now be reviewed by Facebook and if approved, it will go live straight away or on the date you have specified.
Measuring the effectiveness of your campaigns
In order to see whether your campaigns are achieving the results you want, you need to get to grips with Facebook’s Adverts Manager. To access the Adverts Manager, click the blue triangle in the blue bar at the top of the Facebook page and select “Manage Adverts”. You will only have access to this after you have launched your first ad.
The manager may seem complicated, but it’s relatively easy to understand. The notifications section allows you to keep track of which ads have been approved, while the daily spend section lets you monitor your outlay on Facebook ads.
Below that, is more detailed information about the ads you are currently running and have run in the past. Let’s look at what you can do.
Status: This lets you activate or pause a campaign.
Campaign Name: The name of a group of ads you’ve created
Delivery: Tells you whether your advert is running.
Results: Tells you how many actions people have taken in response to your advert. The type of action varies depending on the time of advert. So for a Page Like campaign, it will show likes, while for a Post Engagement campaign it will show engagements.
Cost: Shows you how much you have paid per each action shown in the results column.
Reach: How many people have seen your advert.
You can also see how much you have spent that day, total spend and the start and end dates.
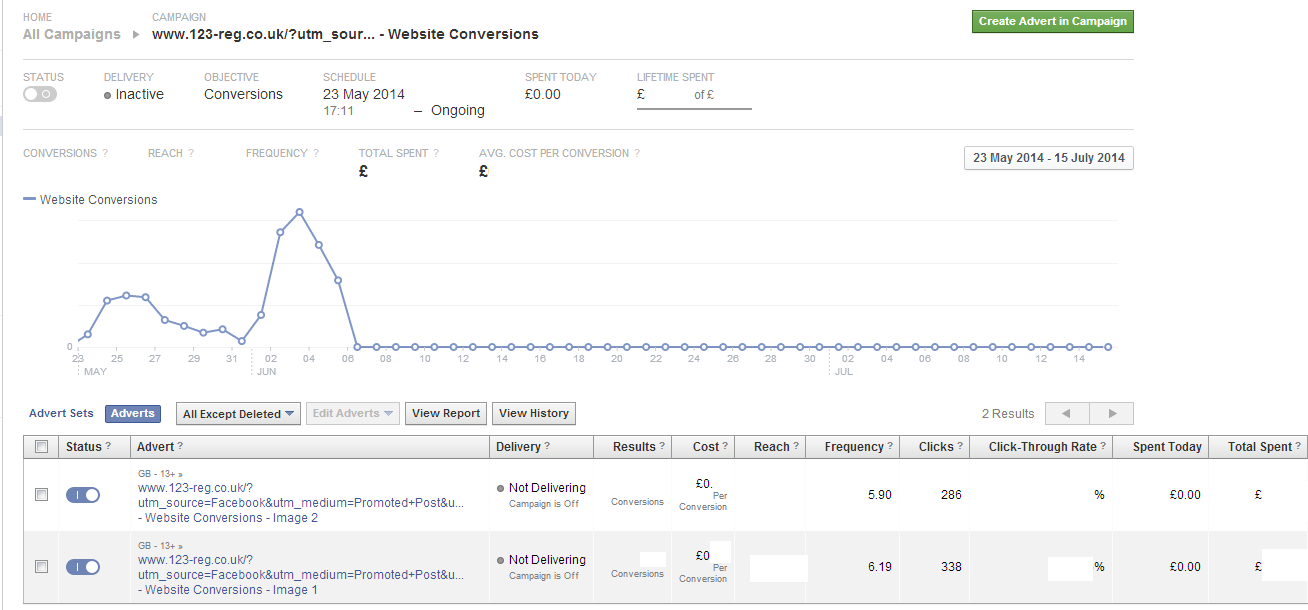
From this screen, you can get a solid overview of whether a campaign is performing as you hoped. However, by clicking the name of a campaign, you can get further detail on how your ads are doing.
One of the most interesting things you can do here is compare the click-through rate (CTR) of similar adverts. In the below example, we’ve run a Website Conversion ad with two different images. The CTRs are roughly the same, meaning that the differing images didn’t have much of an impact. However, if the CTR had been significantly higher for one of the two images, we could have focused our budget on promoting that version of the ad.
That’s the basics of monitoring your Facebook ads. Once you’re more familiar with the system and have a number of ads running, you may want to experiment with creating detailed custom reports.
Next steps
Once you’re comfortable with setting up and running a Facebook advertising campaign, why not try your hand at Twitter advertising? You can learn how with the 123-reg beginner’s guide to Twitter ads.


