
Thinking about introducing Instagram Ads to your marketing strategy? You should be! Without Instagram, you could be missing out on a huge opportunity to capture the attention of your target audience. According to Omnicore Agency, as of December 2017, Instagram has over 800 million active monthly users. 500 million of those are using their accounts on a daily basis. That’s a lot of potential reach for your business without ads – but with ads is how you’re going to stand out from the millions of others using this app by targeting the people you need to see your content at the right time.
By the end of this guide, you’ll be ready to set up your first Instagram advertising campaign and start driving your target audience back to your business.
How does Instagram advertising work?
Instagram uses Facebook’s powerful advertising system, which is especially helpful for targeting your audience by interests, location, past interactions and more.
Once you’ve configured the advertising platform to target these people, they’ll see your ads show up as they scroll through their feeds.
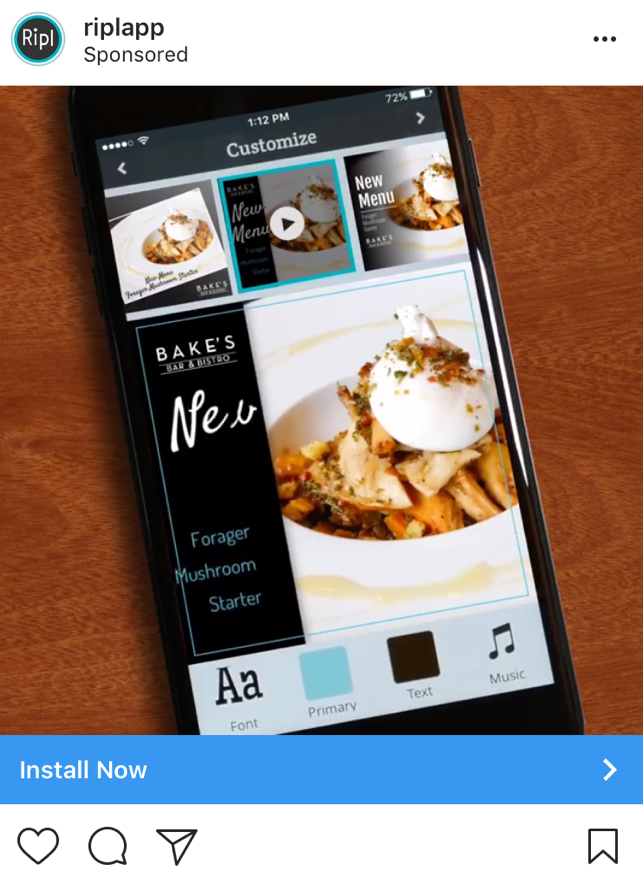
Ads can appear as images, carousels or videos, just like normal Instagram posts (except ads have calls to action) which helps them to fit right in to a user’s feed without disruption.
Are Instagram ads right for your business?
Consider the following:
Does your business have visual appeal?
The visuals do all the talking on Instagram – so can your business deliver? You only have a few seconds to pique the interest of your target audience, so it’s important to make sure that you can provide visually pleasing, high-quality content that will make your business stand out.
Don’t be disheartened if your business is not typically a visual one – there are millions of different types of business who market their services on Instagram. The great thing about Instagram Ads is that you can use a video – so if you can’t showcase stunning images of your product, you can capture it in action.

If you’re still not sure, you might want to consider ads on another social media channel – one that is less focused on aesthetics. Here’s our guide to figuring out what social media platform your business should be on.
Is your target audience on Instagram?
It’s a good idea to identify whether your target audience are using Instagram – if they aren’t, you run the risk of your ads only being seen by people who aren’t interested in the products and services you offer.
As of March 2017, there were 17.2 million Instagram users in the UK, with 56% of them being female and 44% male. 61% of those users were between the ages of 18 and 34, while only 15% were older than 45.
Bearing in mind that these stats only apply to UK users, they give you a pretty good idea of the type of people that are using Instagram – does your target audience fit into these stats?
If it doesn’t, all is not lost. With billions of active users all around the globe, if your audience is not on Instagram, you might well find them hanging out on Facebook and our in-depth guide to Facebook ads can help you target them.
We also have a must-read guide to Twitter advertising if that’s where you’ve discovered the majority of your audience is.
How to create your first Instagram Ad campaign
Things you’ll need:
A Facebook Page (that you are an admin of)
That’s it! You don’t even need an Instagram account (although it is recommended).
You can create an ad straight from your Instagram app, but the most popular way of creating Instagram Ads tends to be via the Facebook Ads Manager, so we’ll look at that option first.
Step 1 – Open up your Facebook Ads Manager
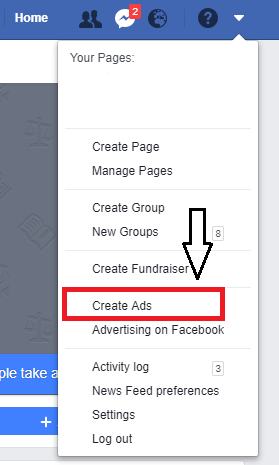
Simply expand the drop-down menu in the right-hand corner of your page and click ‘Create Ads’.
Step 2 – Choose your marketing objective
You can choose from the following goals for your Instagram ad:
- Reach
- Traffic (to your website or app)
- Brand awareness
- App installs
- Video views
- Conversions (on your website or app)
- Engagement (on the ad)
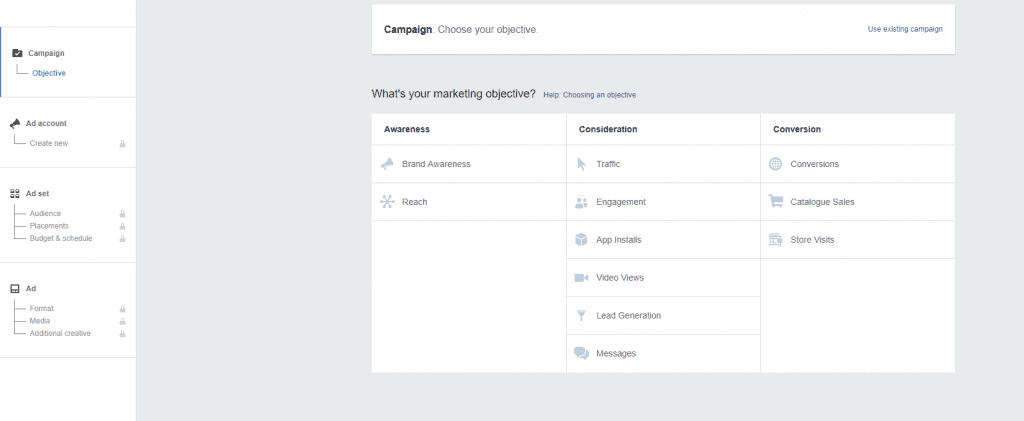
Choosing a goal is easy – just pick the one that corresponds with the result you want from the ad. For example, if you’re setting up the ad to drive more traffic to your website, you’d select the Traffic objective.
Some of the objectives are super easy to set up – just select the one you want and start creating your ad. Others come with a few extra steps before you can create your ad.
Let’s look at what each one does in further detail and explore how to set them up.
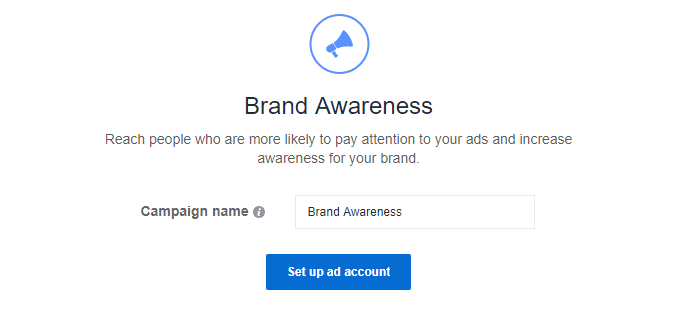
Brand awareness: When selected, Instagram will show your ad to people who are likely to be interested in it, helping you to raise your brand awareness. No extra steps to set this one up – just click and go!
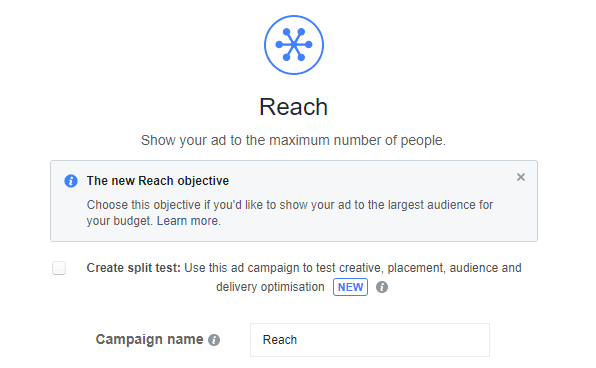
Reach: If you want as many people to see your ad as possible, Reach is the objective that you choose. This will allow you to maximise the amount of people that see your ad and how often they do. Unlike brand awareness, not everyone that sees your ad will be interested in it.
Configuring this objective involves an additional step:
Select the objective, name your campaign and choose a Facebook Page to associate with the ad campaign. If you don’t have an Instagram account, the Facebook Page you choose will link to your business in the ad.
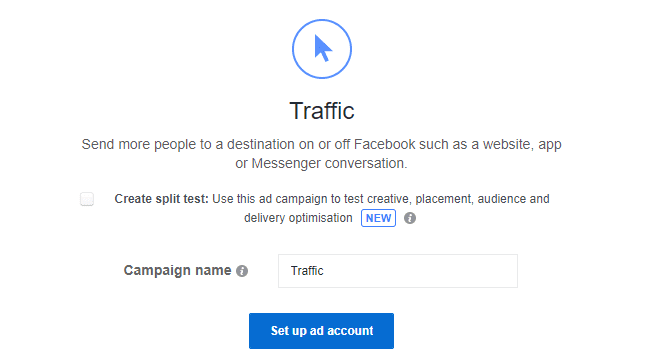
Traffic: Drive users to your website straight from your Instagram Ad.
Next step:
Once you’ve selected the objective and named your campaign, you need to choose where you want to direct the traffic – your website, app or messenger. You won’t need to enter the URL at this point.
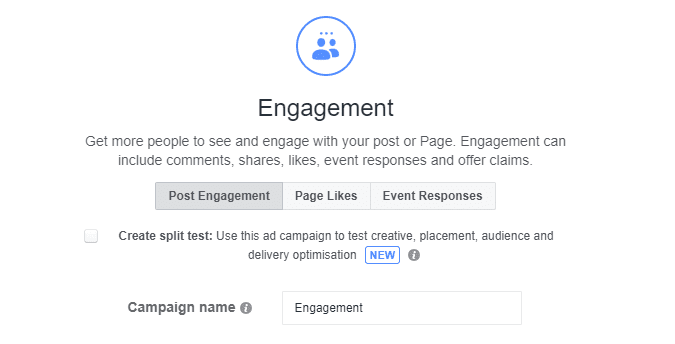
Engagement: This objective allows you to get more people to see and engage with your post – that includes page likes, event responses and offer claims, for example. You can choose the type of engagement you want.
A couple of things to consider
- When using Facebook ad manager, this objective only allows you to promote an existing Facebook page post.
- If you’d like to promote an existing Instagram post, you’ll have to do this by using the Instagram app (which we’ll cover later).
App installs: This objective enables you to send people straight to the app store, where they’ll be able to download your app. A pretty cool plus to this objective is that you can split test and see which version of your ad reaps more downloads.
Next step:
Select the app you’d like to promote, and the app store you’d like to send people to.

Video views: Get your video seen by more people. A very simple objective that has no additional steps!
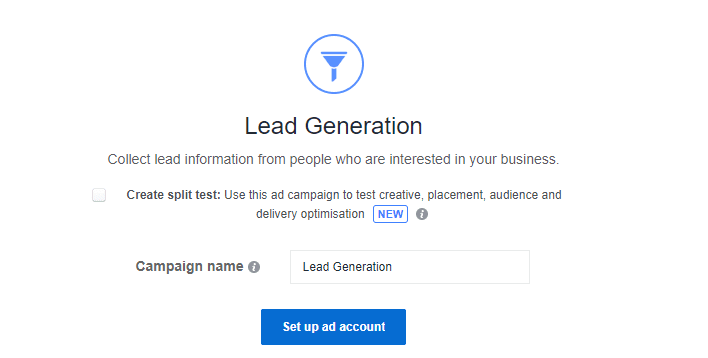
Lead generation: This objective allows you to collect information from potential leads. This will require you to create a lead form for your users to fill out.
Things to consider:
- Lead ads on Facebook are a little different to lead ads on Instagram. Instagram currently supports less pre-filled fields than Facebook and they are: full name, email, phone number and gender.
- While Facebook leads can fill out their information straight from their feed, Instagram users will have to click through to fill out the form.
- Instagram has design requirements your ads will have to follow.
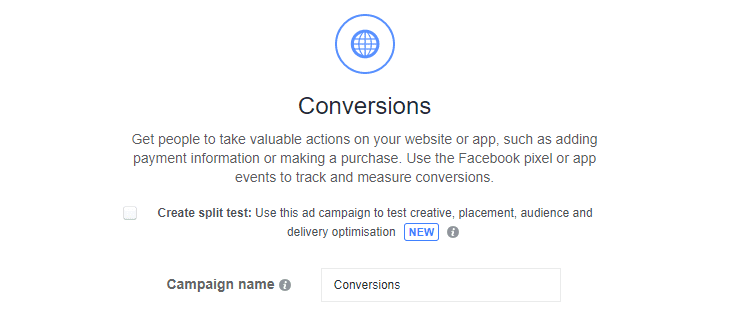
Conversions: This is the objective you need to select if your main concern is driving the users that see your ad to take an action and convert into a sale on your website or app.
Next step:
Choose the website or app you want to promote. Then set up a Facebook pixel or app event to track conversions (there will be instructions provided on how to do this).
Configure your ad
Step 3 – Define your target audience
Now comes the fun part – defining your target audience. The great thing about Facebook is that it allows you to get super specific about this part.
Here are all the factors you can consider:
Location – Choose from countries, regions, states, cities, postcodes, addresses and target or exclude people in those locations from seeing your ads.
Age – Select the age range of your audience, from 13-65+.
Gender – Choose whether you’d like to show your ads to just men, women or everyone.
Languages – Facebook recommends leaving this option blank, unless your target audience uses a different language that’s uncommon in the selected locations.
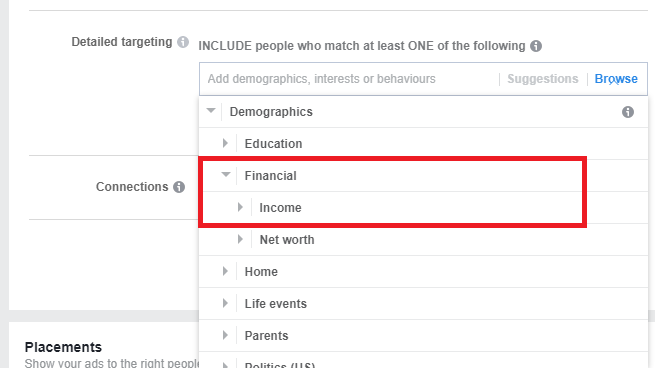
Demographics – You can choose to include or exclude people from seeing your ad based on many different demographic options.
Clicking Detailed Targeting leads you to a drop-down menu:
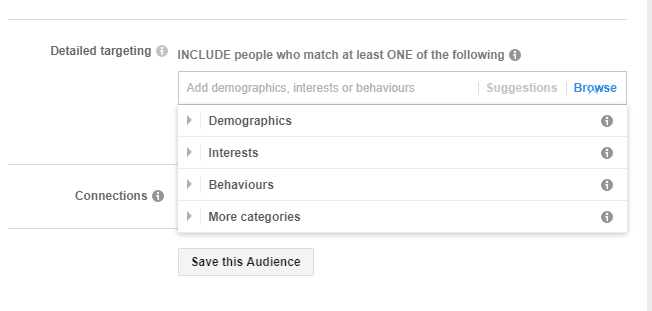
Selecting Demographics leads you to further drop downs:
Once you’ve chosen your criteria, Facebook will show you your final estimated reach – potential and daily. Pay attention to this – it’s important to make sure your audience is not too specific as there may not be many people to reach within those options.
Equally, it’s important to make sure it’s not too broad or you run the risk of displaying your ad to people who aren’t really interested in your business.
Step 4: Define the placement of your ad
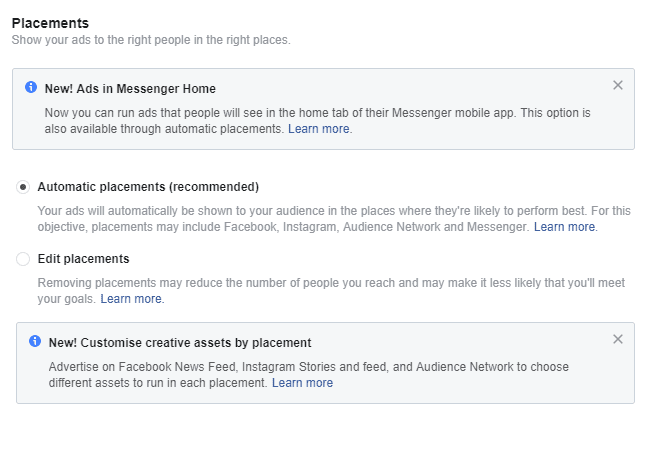
This is where you choose where you want your ad to appear. If you only want your ads to appear on Instagram, you’d select ‘Edit Placements’ and deselect Facebook. The ‘Edit Placement’ option will also allow you to choose where on each platform your ads will appear.
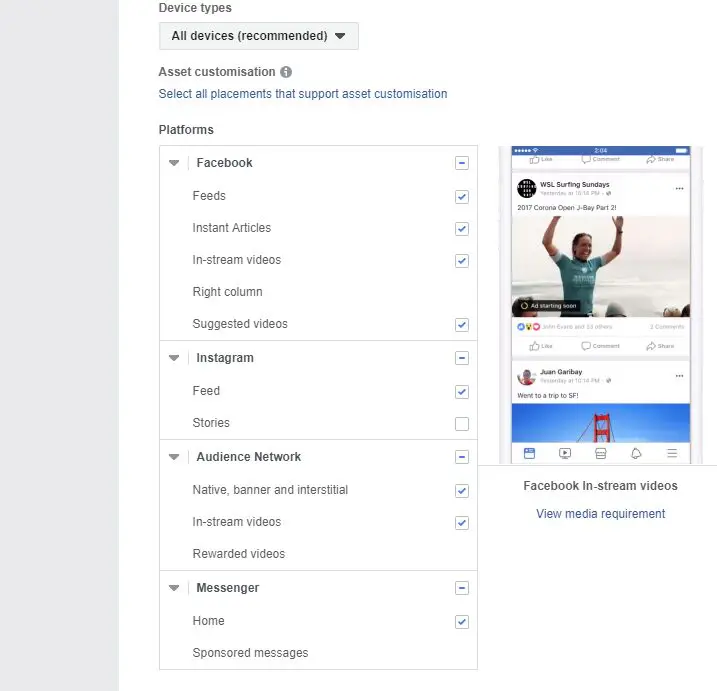
‘Automatic Placements’ will allow your ads to appear across both Facebook and Instagram, in the places where Facebook determines they will perform best.
Step 5: Set your budget and schedule
Here, you’ll choose how much you want to spend on your ads and how long to run them for.
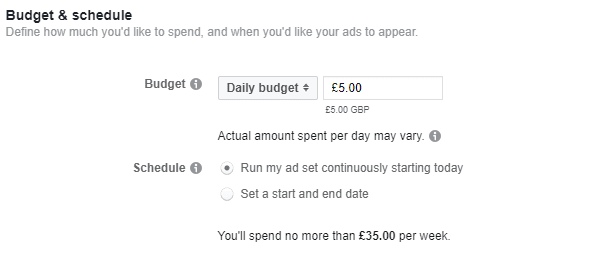
Budget
You can set a daily budget, which is the average amount you’ll spend on your ads day-by-day. This is a good option if you want to limit the amount you spend a day.
Or you can set a lifetime budget – which is the total amount you want to spend on the ad for the duration that it runs.
If you choose the lifetime budget, you can create a schedule for your ads to run, which is handy for targeting the days and times that your audience is most active on the platform you’ve chosen.
Schedule
You can opt to let your ad run continuously until you hit your lifetime budget or decide to pause it. Alternatively, you can set a start and end time for your ad.
There are advanced options, but you don’t need to worry about those as they will already be set to Facebook’s default recommendations.
So how much should you spend on your app?
There’s no one-size-fits-all answer. It primarily depends on your budget – but it’s good to know that your budget is final and an Instagram ad will never cost you more than you spend.
Different spends will bring different results – this doesn’t necessarily mean you have to spend more to get more out of your advertisements. Here’s a guide that breaks down the cost of Instagram ads if you’re not sure how much to spend.
Creating your ad
Step 6: Choose an ad format
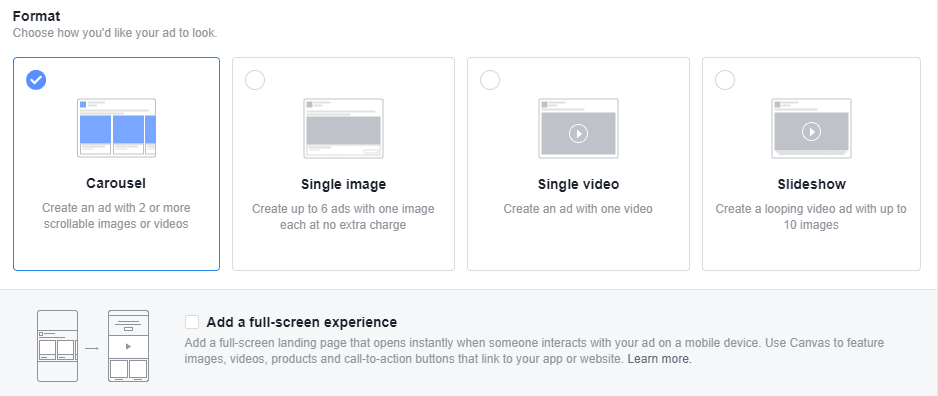
Carousel
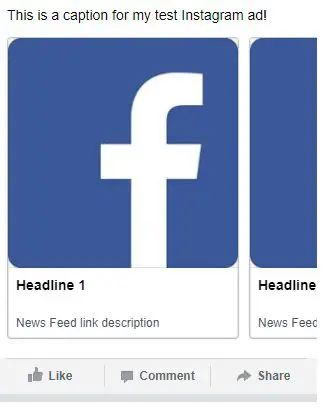
A carousel is an ad with two or more images or videos that a user must scroll through to see each one. To create a carousel, you can connect your Instagram account at this step if you haven’t already, and then write the caption for your ad in the text field.
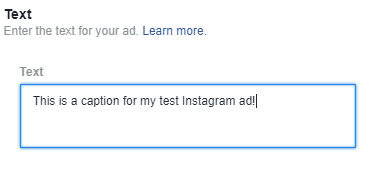
You’ll see a preview of your ad on the right-hand side.
Also, take note of the specs that appear on the left-hand side.
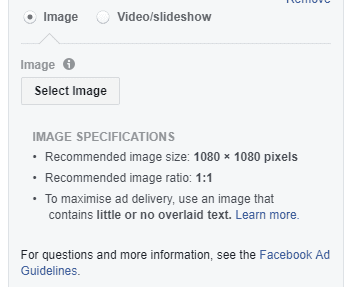
Next, you’ll upload your images and/or videos (you can choose up to 10).
The Destination URL option connects to your call to action.
You can choose a different call to action for each slide, which helps if your media has slightly different messaging.
For more on Carousel Ads, check out the Facebook guide to them here.
Single image
Single image ads are great because they slot into the feed nicely and don’t even look like ads if done correctly. Creating them is slightly easier than the carousel format – all you have to do is upload the image you would like to use, add your caption, website URL and CTA if required.
Note: This is also one of 2 options you can use to create an Instagram Story ad using the same process.
Single video
If you have some eye-catching video content that you’d like to use for your ads, you can go ahead and use this option to create one by uploading the video of your choice and then choosing a thumbnail from the options provided. You could also upload your own custom thumbnail. Add your caption, URL and CTA and you’re good to go!
Note: This is the second of 2 options you can use to create a 15-second Instagram story ad using the same process.
Slideshow Ad
You can add 10 images and music to a slideshow ad, which then creates a looping video ad. You can either upload an existing slideshow or create a new one using Facebook Ad Manager’s slideshow creator.
Creating an ad from your Instagram App
You can create an ad using the Instagram app by promoting a post.
Things you’ll need
- An Instagram Business account
- A Facebook Page that’s connected to this Instagram account – that you are an admin of
Step 1
Under each of your posts, you’ll notice a blue ‘Promote’ button. Select it.
Note – this button may be greyed out if the resolution of the photo is too low. When you try to press it, Instagram will tell you that you need to choose a higher quality image.
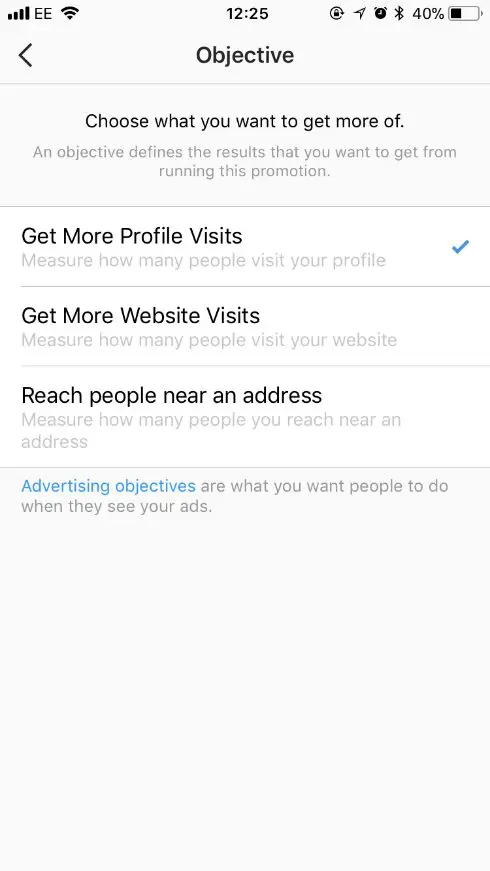
Step 2
Choose an ad objective – you can only choose Get More Profile Visits, Get More Website Visits or Reach people near an address.
Step 3
Set up your ads with the same options as Facebook Ad Manager:
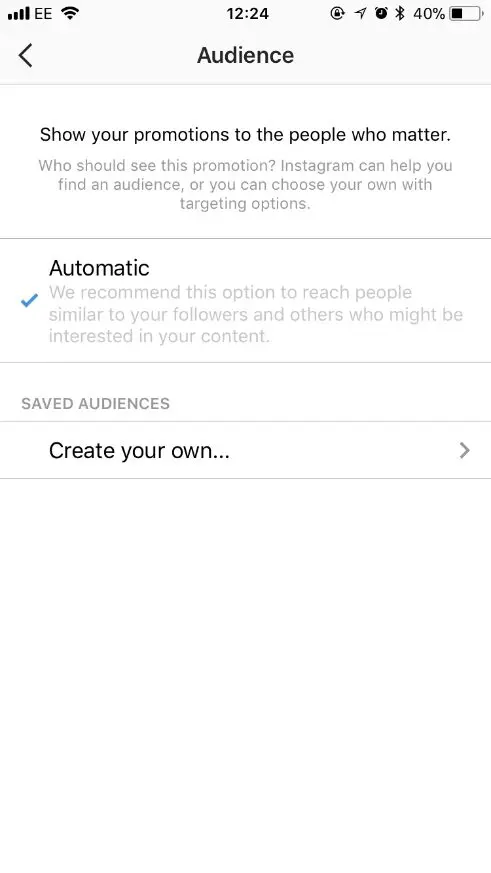
Audience – You can target by locations, interests, age and gender.
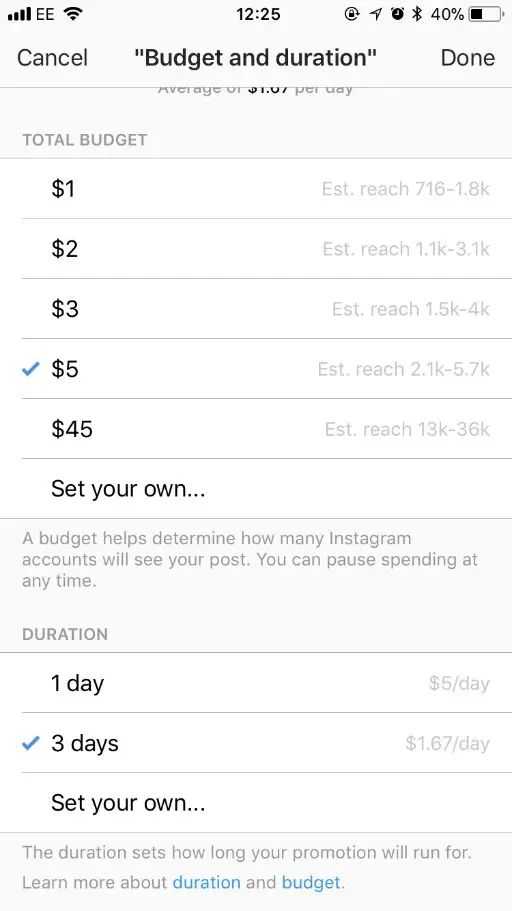
Total budget – Unlike Facebook Ad Manager, you can’t choose daily or lifetime and there are no advanced options.
Ad Duration – The number of days you want to run the ad.
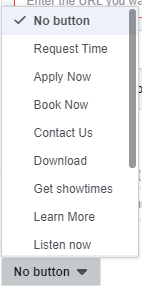
Then choose your call to action and preview your ad. Set it live and you’re done!
So there you have it – all the knowledge you need to create your first Instagram ad. Read this handy guide for more tips on Instagram marketing, and get ready to start generating traffic from this ever-growing platform.


