
Many people look to free blog platforms when they are starting online. It’s perfectly understandable. Blogger and WordPress.com are free and easy to use, even for people with no technical skills. In addition, a blog or a website can usually be set up within minutes.
But while “outsourcing” the hosting of your content to a free platform seems like a reasonable move, the reality is that you do not own your hosted blog or site, which also means that you do not have complete control over what happens to it.
In the worst-case scenario, you may use a platform that disappears entirely. Posterous, a once-popular blogging platform, recognised as one of the “2010 Hottest Silicon Valley Companies”, shut down, deleting all blogs and archives. Can you imagine if that happened to the free blog platform you’re using?
Although it’s tempting to get started with a free option, if you’re looking to build authority, a professional brand or a serious business, then you’re better off moving from WordPress.com to .org, where you’ll have your own domain and complete control over it.
Read on to find out how you can make the move.
But first…
What’s the difference between WordPress.com and WordPress.org?
WordPress.com is one of the most popular free platforms that allows you to set up a website or blog and host it on their platform without having to worry about costs or any technical aspects that come with creating a blog or site such as finding a hosting provider, maintaining the site or setting up security and anti-spam filters.
While it’s free, simple to install and set up, this convenience comes at a cost, and we’re not talking money. Here’s what to expect:
- You cannot use custom themes or themes outside the WordPress repository, which you also cannot customise.
- You cannot have a custom domain name, only a subdomain like wordpress.com, which doesn’t look very professional.
- You cannot upload any free, paid or custom plugins.
- You have no control over the ads that are displayed on your site (which you also don’t make money from, only WordPress does).
- You have very little control over your website search engine optimisation (SEO) since you’re not allowed to install SEO plugins.
- You have limited analytics, which means you’ll have little access to information about your visitors, what they’re reading or how to improve your blog or site.
On the other hand, with the self-hosted WordPress.org you get to enjoy all the benefits of using WordPress with your own domain, such as:
- You can use the domain name you want.
- You have the freedom to add your custom theme which you can modify and customise as you see fit.
- You can use any free, paid or custom plugins you want to enhance your site’s look and functionality. This includes SEO plugins that can help your blog or site to get found at the top of the search results by users looking up your brand name or content.
- You have complete control over the ads you choose to display on your site and the ad service you use. And what’s more important is that you get to keep 100% of the revenue.
- You can get access to valuable insights into how your visitors are using your site, and what you can do to make their experience better and more pleasant. That’s because you have the freedom to install any analytics tool you want, from Google Analytics to any third-party tool you want.
So when you use WordPress with your own domain, not only do you have full control over how your site or blog looks and behaves, but you can also make a better first impression and build a strong reputation easier than with a yoursiteaddress.wordpress.com or yoursiteaddress.blogspot.com.
Ready to get moving from WordPress.com to .org? Here are the steps you need to follow to make the switch from WordPress or Blogger to your own domain.
Things you need before you get started
To move your site from free blog platforms like WordPress or Blogger to your own domain, you will need two things:
- Your own domain name and server space to host the site. Needless to say, 123 Reg has a great selection of domain name extensions and UK web hosting to get you started. You can even get a free domain name to help you on your way.
- Access to your existing WordPress or Blogger account so you can easily move all your content and data to your new domain.
Set up your new self-hosted site
Our web hosting offers one-click WordPress installation, which means that all you need to do is to log into your 123 Reg control panel and click to install the WordPress application.
This video tutorial walks you through the steps to follow to install WordPress or another one-click app to your hosting package.
When that’s done, it’s time to export and import all your content into your new self-hosted WordPress or Blogger website.
Exporting and Importing Content: WordPress
First up is WordPress as it’s the most popular free hosting platform on the web.
Step 1: Export content and data from your old site
1. Log into your current WordPress account and go to Dashboard.
2. Click Settings from the left-hand side menu and then scroll down to the Site Tools section where the Export option is located.
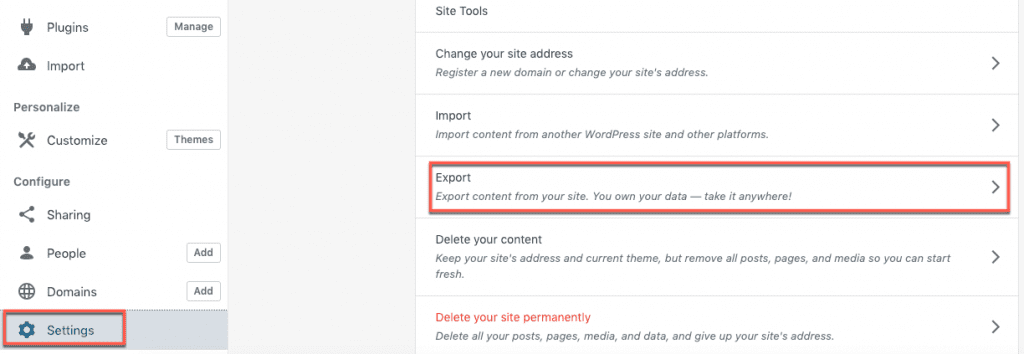
3. Click Export and then click the “Export All” button.
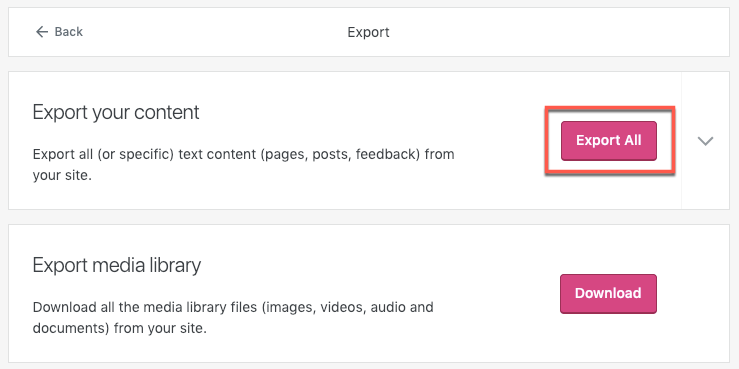
You can download the content directly from the dashboard or from the download link sent to the email address associated with your WordPress account.
This will save an XML file to your computer with the content from your site.
4. Next, you should also download all the images, videos, audio and documents from your site by clicking the “Download” button next to the Export media library.
Make sure that you know where these files are downloaded to as you’ll need them in a moment.
Step 2: Import content and data into your new site
1. Log into your new WordPress site.
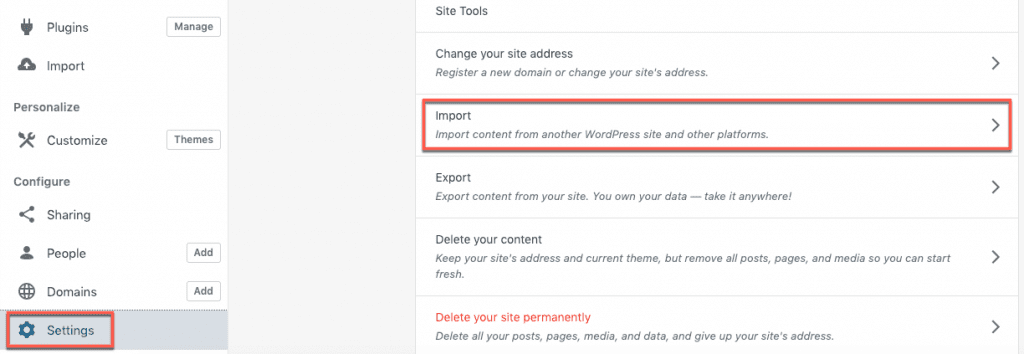
2. Click Settings from the left-hand side menu and then scroll down to the Site Tools section where the Import option is located.
3. The first option is WordPress so now simply click the “Start Import” button.
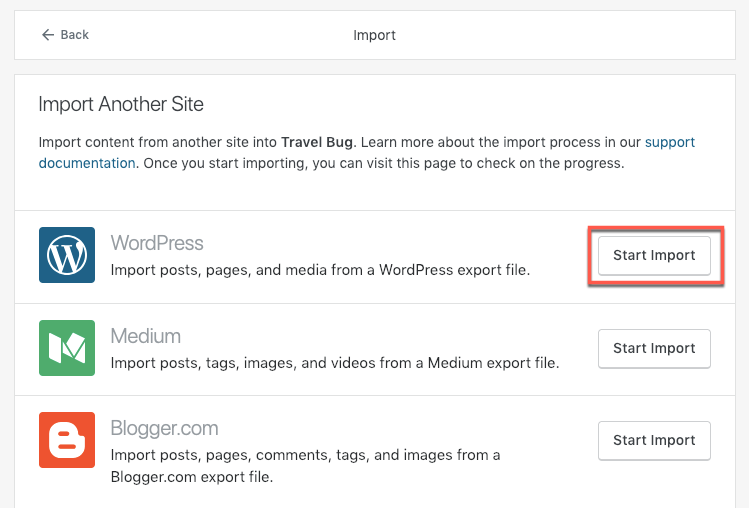
As you can see, you can also import from Blogger and other platforms.
4. Next, you’ll need to click to upload your files. So navigate to the export file you just downloaded and upload it. You should get a message that the file was successfully uploaded.
5. Now click “Continue” and then “Start Import”.
6. Do the same with your Media library files.
That’s it! All your content and data is now transferred from your free WordPress account to your stand-alone WordPress application.
But you’re not done just yet.
Step 3: Redirecting visitors and search engines to your new site
Most likely, one of the main reasons you’ve decided to move to WordPress with your own domain is the increased popularity of your blog or website. So, of course you want keep your current visitors and maintain your SEO and backlinks.
Since you can’t change the .htaccess file on a free WordPress.com hosted blog, you can’t add redirects there to redirect visitors and search engines to your new site. You also can’t add a rel=”canonical” link in the header of the page because you’re not allowed to edit the template on the free site.
So, what can you do? You can try a site redirect.
This is your best bet to redirecting yoursiteaddress.wordpress.com (as well as all your permalinks) to your new domain name.
Basically, it’s a 301 permanent redirect which allows your site’s visitors and search engines to be automatically redirected to your new site, while also transferring search engine rankings from your old site to your new one. When the redirect is completed, the old site will not appear to visitors at all as will be immediately and seamlessly redirected to the content on your new site.
This is, however, a paid upgrade, and the service costs $13 per year. If you want to use it, you can purchase it from the Store page in your Dashboard. Check out the complete guide on redirecting yoursiteddress.wordpress.com to your new domain.
Transferring Content: Blogger
Before you start the import process, you’ll first need to export your content from Blogger. When you’re logged into Blogger, go to Settings > Other and click Back up Content > Save to your computer. This will generate an XML file with all your content from Blogger.
Next, follow the steps below to transfer your Blogger website content to your new self-hosted WordPress site:
1. Go to your WordPress dashboard and from the left-hand site menu click “Import”.
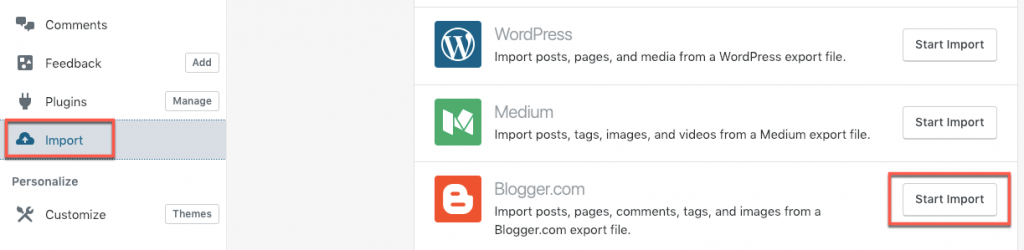
2. Next, go to Blogger and click the “Start Import” button next to it.
3. You’ll see the import form on the next page. Drag your export file into the box, or click the box to browse to where you saved the Blogger file on your computer.
4. Once the file is processed, click “Continue” to transfer the content from Blogger to your WordPress site.
That’s it.
Final step: Let readers and subscribers know you’ve moved to your own custom domain
One last thing we’d recommend is to make a public announcement about your moving to WordPress with your own domain.
You can easily do this by publishing a blog post on your new site where you let everyone know about your new place online. Ideally, you should also write one on your old site weeks or even months before moving to the new website so readers are made aware that you’re moving.
Of course, don’t forget to update your social media audience and email subscribers, if you have them.
This will help them remember the name of your new domain once they read about it. Plus, you can encourage them to share their feedback and spread the word about your new awesome blog or website.


