How to choose the right WordPress theme for your website
So you’ve settled on WordPress as your website platform of choice, but you can’t decide which theme you should use. You’ve scrolled through what seems like thousands of choices and you can’t make up your mind. And it’s stopping you getting your WordPress site up and running.
Good news is, you can get it right the first time. How? By simply asking and answering a few questions which allow you to determine whether a theme is a match for your site before you commit to it. In this post we’ll share the key questions and things to consider before choosing a WordPress theme to ensure it’s a great match for your needs now and in the future.
Let’s get started.
Questions to ask yourself before starting your theme search
1. What’s the purpose of my website?
The first thing to consider when building an online presence is what you want to achieve with your website.
For example:
Is it a blog where you publish valuable content to inform, educate and entertain readers? Then a blog theme is your best choice, with a homepage that highlights articles with sidebars and categories.
Is it a portfolio that you want to use to attract potential clients? Then look for an attractive theme where you can showcase your portfolio, experience and testimonials.
Is it a presentation website? A simple and clean WordPress theme where you can describe your services right on the homepage might work best for you.
Is it an online shop? Then you need to go with a theme that makes purchasing a product easy.
2. What’s my business about?
Also take into account the niche or industry you’re in as this helps you to determine the type of ‘look’ that would work best for your site.
For example, if you’re a wedding photographer, a theme with a more delicate and elegant design will give potential clients a feel of what you can achieve for them on their special day.
If you’re selling vinyl records or typewriters, you’ll maybe want a theme that’s a little more old school.
3. Who is my target audience?
Who do you want to attract to your site? Who will be reading your articles, browsing through your portfolio or purchasing your products?
The more you know about your target audience, the easier it will be to choose a design that gets their attention and makes them feel at home on your site.
Now’s the time to do some research, if you haven’t already, and put together an ideal customer or reader profile where you define who they are, what they’re interested in, what problems they need solving, and more.
Our guide on buyer personas explains why these profiles are so important to your site’s success and how to create yours.
4. What do my competitors’ sites look like?
Just as you research your audience, you should also research your competitors. So take a look at their websites to see what they look like.
How do their homepages look? How is the information – text, images, videos – organised? What kind of colours and fonts do they use?
Take note of the similarities and differences in style, and consider whether you want to use a similar design or try something unexpected.
5. What kind of functionality does my site need?
When building a site, the way it looks is only part of what contributes to its success. So, apart from a nice design, you also need to make sure that your site has the functionality you need.
For example, if you want to sell products online, you’ll need a theme that allows you to showcase product descriptions, images and maybe also videos. You may even want to allow customers to leave reviews directly on your site.
Are you a travel blogger? Then you’ll need a way for readers to find content easily by organising it into different categories such as by country, type of trip, budget, and more. You’ll also want to encourage them to share their experiences, which means having a comments section at the end of each article.
Make a list with the features that your site can’t be without and use it when selecting your WordPress theme.
6. What’s my budget?
Your budget will play an important role in choosing a theme.
Fortunately, there are lots of WordPress themes for all budgets. You can get a free theme from the WordPress.org theme directory or a paid premium theme. Just keep in mind that premium themes aren’t always better. So, make sure you look at both options before deciding on the theme you want to use for your website.
Plus, if you use 123 Reg WordPress hosting, we offer 50 themes for you to choose from.
Note: If you use the 123 Reg Website Builder to build your site, you’ll not only get email, hosting and a free domain included in your package but also access to lots of professional free templates for all types of sites, whether you want to build a blog, a portfolio or a business site.
If you want to sell products online, you may also want to consider our Ecommerce Website service, which allows you to easily get your online shop up and running using one of our fully-customisable, professionally-designed templates. The best thing about these templates is that you don’t need any technical skills to customise them.
Things to consider when choosing your WordPress theme
Once you have a clear understanding of your website’s purpose and how you want it to look and function, you can start your theme search. Here’s what to look for when choosing your site’s WordPress theme:
Simplicity
You’re bound to stumble upon lots of flashy, colourful, attention-grabbing WordPress themes that have a complex layout. But here’s the thing: unless you really need all the bells and whistles, stick to a simple, clean, easy to navigate theme for your site.
Your visitors will appreciate it since they’ll have an easier time finding their way around your website.
Responsive design
Responsive themes adjust their layout across different screen sizes and devices. This means that your site will look and function well on all mobile devices and screens.
Now, since a significant number of web traffic is generated from mobile and tablets, having a responsive theme is non-negotiable.
But it’s not just the increasing number of people using handheld devices to go online. It’s also Google’s preference for mobile-friendly websites, which the search engine giant rewards by showing them on top in their mobile search results.
So make sure you choose a WordPress theme that’s responsive. This ensures it works well for anyone visiting your site, whether they’re using a laptop, tablet or phone.
Browser compatibility
Apart from devices, your website also needs to look and work well across different browsers.
Some of your visitors will use Firefox or Safari to access your site, but others might use Google Chrome or Edge. So you need to make sure that the theme you choose is compatible with the most popular browsers or the ones that your audience uses most to visit your site.
Supported plugins
No matter how great a theme is, there’s a good chance you’ll need to add extra functionality to it. And how do you do that? By installing WordPress plugins that allow you to add more features to your site from contact forms to maps, image galleries and social media sharing buttons.
So, make sure that you read the WordPress theme’s description carefully to ensure it supports all popular plugins.
SEO friendliness
If you want your visitors to quickly find your site in the search engine results, you’ll need to follow search engine optimisation (SEO) best practices. This also means using a theme that’s SEO-friendly.
Read the description and features of the theme you’re planning to use for your site to ensure it’s optimised for SEO.
Ratings and reviews
Looking at the theme’s ratings and reviews is always a useful indicator of what to expect. So pay attention to the ratings that your chosen theme has, and read through some of the reviews to get more information about its quality and other people’s experience using it.
Updates and security
The WordPress software is updated and improved constantly. If you want to ensure that your theme not only continues to work well but it’s also safe and secure, you need to choose a theme that’s also constantly updated.
The theme you needs to be compatible with the version of WordPress you’re running. and, if it’s been more than six months since a theme has been updated, you might want to keep looking.
How do I install a theme in WordPress?
WordPress offers a vast library of themes to customise the look and feel of your website. Let’s walk through the process of finding and installing your ideal theme.
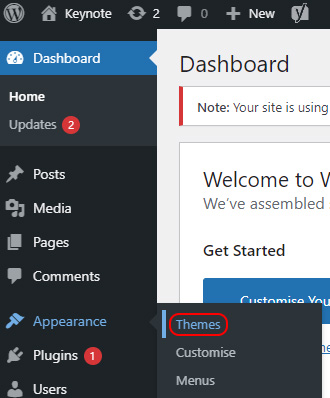
Begin by logging into your WordPress admin area and navigating to the Themes Section: In the side menu, find Appearance and then click Themes — this will take you to the theme management area.
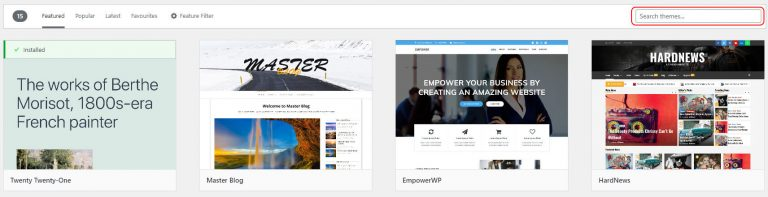
On the Themes page, click Add New to explore the available options. You can use the search field to find themes with specific features or aesthetics. When you find a theme you like, hover your cursor over it and select “Details & Preview” to see it in action. If it fits your vision, click Install to add it to your website.
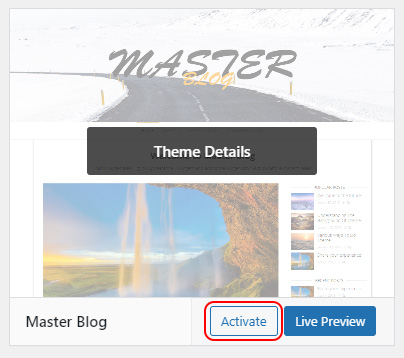
You’ll then need to activate it. Once the installation is complete, return to the Themes page. Locate your newly installed theme, hover your cursor over it, and click Activate.
How do I change my WordPress theme settings?
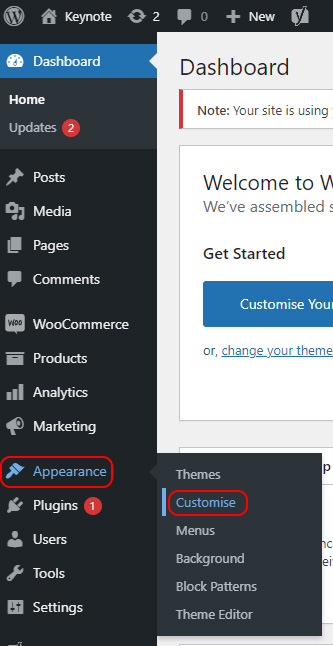
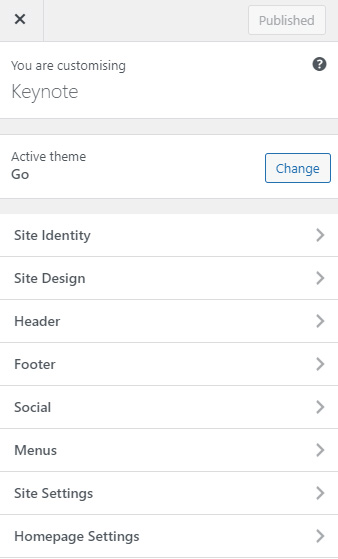
Start by accessing your Managed WordPress dashboard. From there, select Plugins from the left-hand menu, followed by Customise.
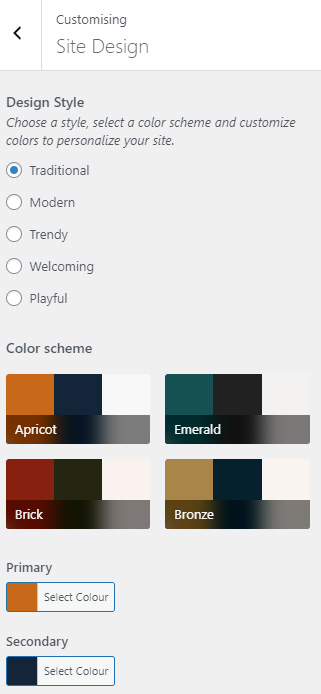
Simply select the option you wish to update. For example, if you wish to update your site’s colour scheme or background colour, select Site Design.
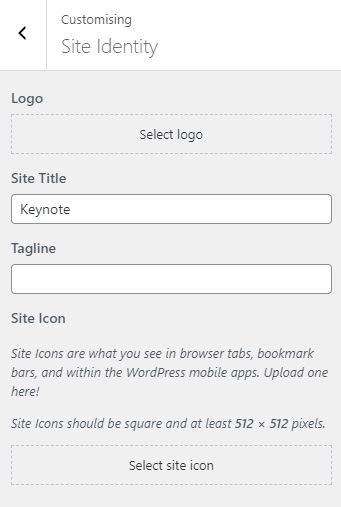
Similarly, if you wish to update your site’s logo, select Site Identity.
If you want to update any other aspect of your site, such as your header, footer and menus, simply select the relevant option within the left-hand menu. You can also view how your site will appear across different devices. Easy!
How do I create a Child Theme in WordPress?
Creating a child theme in WordPress is a way to tweak your website’s appearance without changing the original theme — making a copy of the main theme (the parent theme) with all its features and styles.
Using a child theme, you can customise your site’s look without affecting its core functions. When the parent theme gets updates, your tweaks stay safe. If you’re not happy with your changes, you can switch back to the parent theme easily.
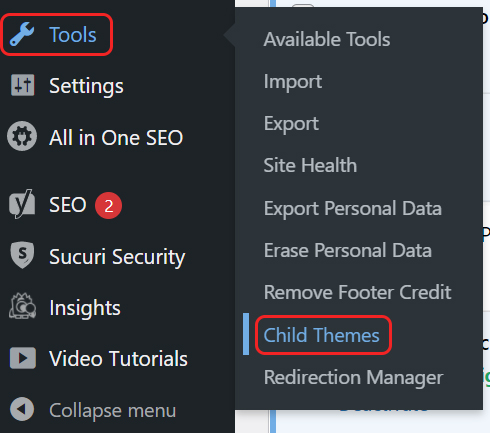
To create a child theme, you’ll need to find and install the Child Theme Configurator plugin. Once activated, go to Tools in your WordPress dashboard and you’ll see Child Themes.
Choose to create a new child theme and pick your parent theme from the list. You’ll need to be sure the parent theme is suitable for making a child theme (some won’t let you do it!).
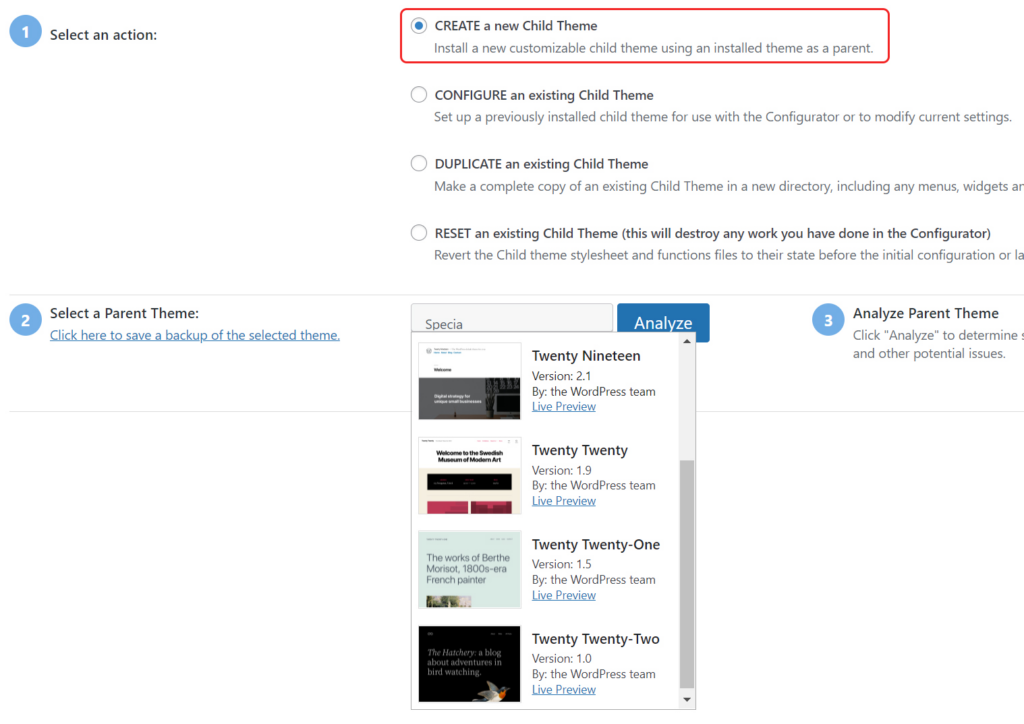
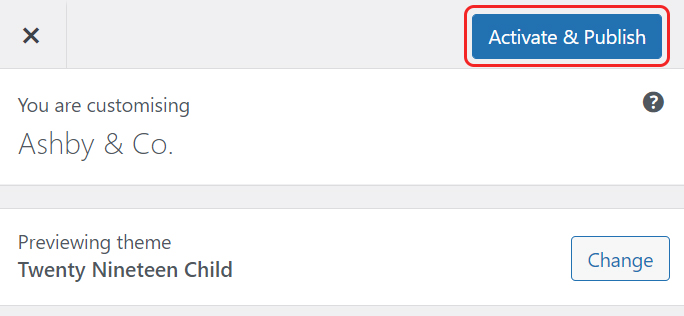
Customise your child theme settings as you please then create the new child theme. Once done, preview it to see how it looks. You can adjust the design and layout further on the customisation page. When you’re happy, activate and publish the child theme. You can manage it alongside the parent theme in the Themes section anytime you like.
How do I change my fonts in WordPress?
There are two ways to change fonts in WordPress: natively, without a plugin, or using a third-party plugin.
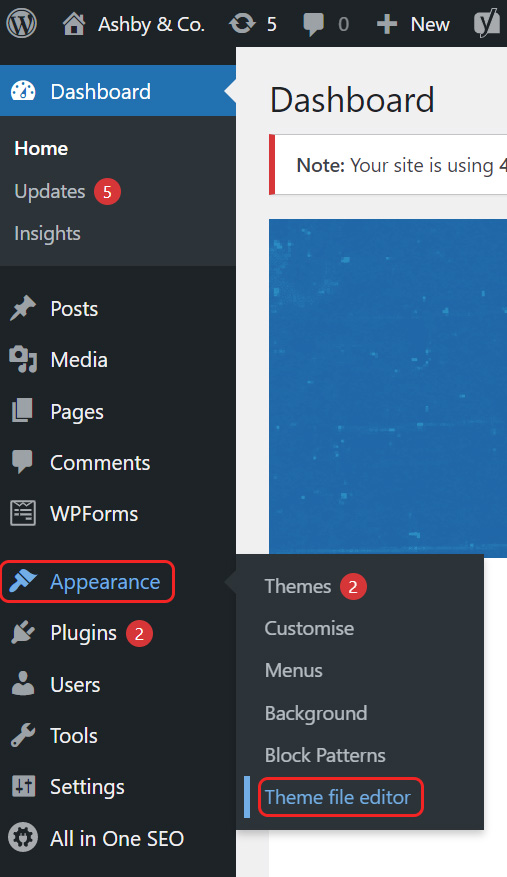
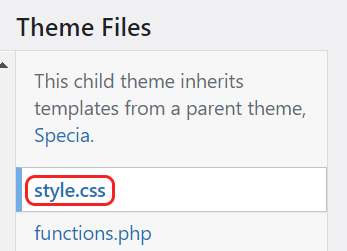
To do so using the native tools in WordPress, start by going to your WordPress dashboard. Navigate to Appearance and then select Theme file editor. Locate style.css and add a line of code with your desired font.
WP Google Fonts is one of the most popular options if you’d like to go the plugin route, but there are plenty of others out there. You’ll need to start off by installing and activating it (see above). Then, access Google Fonts in the dashboard. Choose your desired fonts from the menu and customise as needed. Once happy and ready, be sure to save your changes.
How do I add a favicon to my WordPress website?
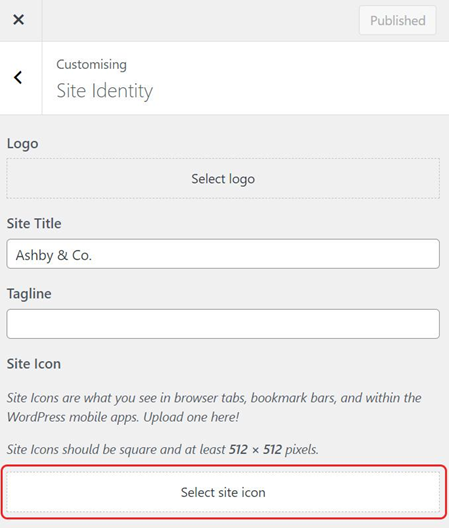
A favicon is a small image situated within your browser that can be used to help visitors find your website when they have multiple tabs open. Adding one is an easy way to improve your site’s branding. It’s usually a good idea to use your logo as the basis for your favicon, sized at 512 x 512 pixels.
To add a favicon icon in WordPress, start by accessing your WordPress dashboard. Hover over Appearance in the left-hand menu and click Customise.

This action takes you to an area where you can customize your site’s design. Select Site Identity from the menu, then hit the Select Site Icon.
A pop-up window will appear, allowing you to upload your favicon image by dragging and dropping it or selecting it from your computer. After uploading, click Select to save your choice.
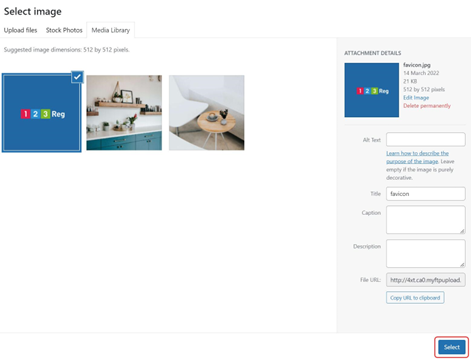
Your WordPress favicon is now uploaded and ready to use. To change it, simply repeat the process and select Change image instead of Select site icon.
How do I duplicate a page in WordPress?
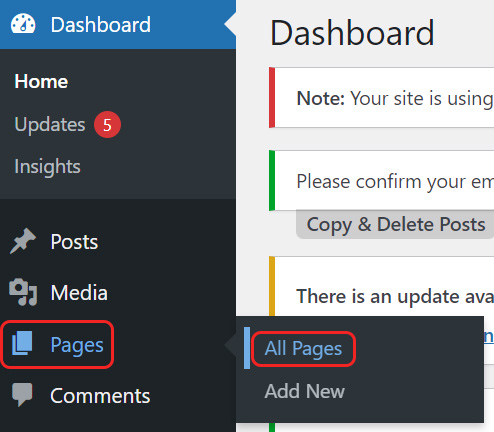
To duplicate a page in WordPress, start by accessing your WordPress dashboard. Navigate to Pages in the left-hand menu and select All Pages.
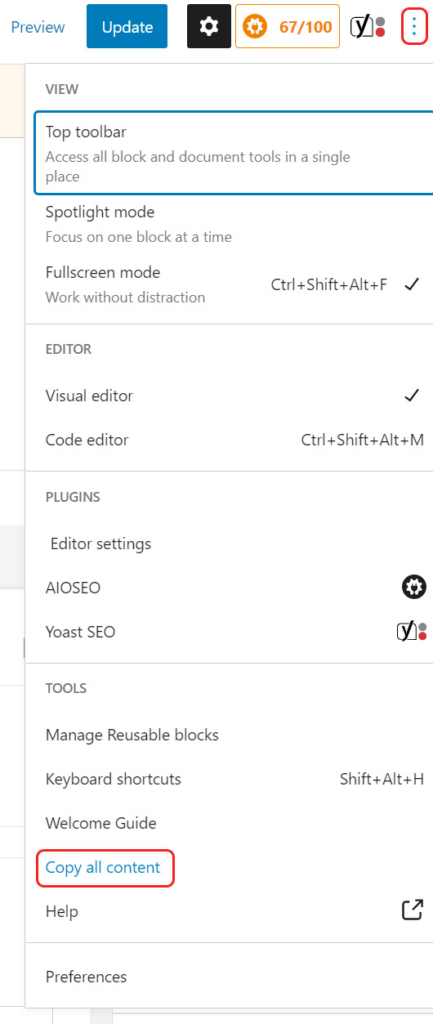
You’ll see a list of all your pages. Once you’ve identified the page you want to duplicate, click on it to enter the Edit section. In the top-right corner, click on the three dots and choose Copy All Content from the dropdown menu.
Now, return to the Pages section and click Add New to create a new page. Within the new page, select one of the content boxes, and press CTRL and V on your keyboard to paste the copied content.
How do I edit the footer of my WordPress Website?
Start by accessing your WordPress dashboard. Hover over Appearance and click Customise. This takes you to an area where you can adjust your site’s design. Look for the Footer option in the menu on the left. If your theme supports it, select this option to customise your footer text.
As ever, you can also choose to do it with a plugin. Find a well-reviewed plugin that allows for footer customisation and be sure to save any changes you make!
Keep in mind that if you deactivate or uninstall third-party plugins, it could lead to certain features not working or disappearing from your site — and footer plugins are no exception!
Wrapping up
Your theme plays an important role not just in how your site looks, but also in how well it functions and performs. That’s what makes the task of finding the perfect WordPress theme so difficult and time-consuming.
Hopefully, the tips and advice in this article will help you to choose a theme that will set you up for success both now and in the future.
