A beginner’s guide to having the perfect images for your website
Images are an important part of any website but choosing the right ones can be a tricky beast. The right image on a web page can capture attention, inform, and even persuade your site visitors to take the action you want. It can help communicate who you and your business are more quickly than words alone can do.
It can also cement a brand, drive engagement and generally provide an awesome user experience. You can even use images to boost your search engine optimisation (SEO) rankings.
The right image can make a huge impact.
The wrong image, however, can confuse, annoy, and even drive visitors away. It can give visitors a negative impression of your business that you may never have the chance to correct.
For the above reasons, you need to be careful when choosing images for your website. Today’s post will shine light on the guidelines you should use to evaluate and select the right website imagery.
Things to consider
Here are the key things to consider when choosing your website images:
Visual appeal and originality
You only have a few seconds to grab your visitors’ attention. So make sure you use high-quality eye-catching images to entice people to stay on the page and to direct them to take a desired action.
It’s unlikely that you’ll be able to achieve that with cliché or overused stock photos. Take this image:

Using an image like this on your site does nothing to distinguish your business from your competitors. Not only that but it comes across as unimaginative and fake, and offers no emotional impact to the viewer.
This doesn’t mean you shouldn’t use stock images. Just make sure the ones you use on your site communicate something unique about your business and also evoke an emotional response. Imagine a photograph of someone who looks pleased to be using your product or service. This can reinforce the prospective customer’s desire to feel equally positive about their own purchasing choice.
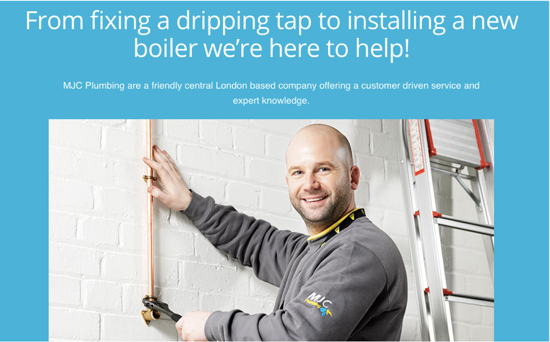
For example, if you’re a baker, try to avoid using a generic image like this one that says nothing about you, your values or your business.
Instead, go with one that shows a bit more of your personality and your passion for what you do, like this one for example. This image offers a warmth and context that can help the baker showcase its most important brand attributes and tells a convincing story without using words.
Quality
High quality images are a necessity for attracting potential customers which is why you need to ensure yours look sharp.
If you use low-quality images, the message you’re sending to your customers is that you’re a low-quality business. The visuals you use are extremely important, even more so if you sell items that are dependent on looks and are using aesthetics as a big selling point.
According to social media marketing expert Jeff Bullas “in an online store, customers think that the quality of a product’s image is more important than product-specific information (63%), a long description (54%) and ratings and reviews (53%).”
Taking the time to invest in high quality photos can mean the difference between a potential customer choosing your company over your competitors. Images can improve the likelihood of a call or a sale so make sure the ones you use on your site are high resolution and professional.
Dimensions
Make sure you get the right sized images for your site. For those unfamiliar with image dimensions, these refer to width and height in pixels.
For example, this blog content is 600 pixels wide. There is no need for me to size images any larger than 600 pixels since the content are will only display up to 600 pixels. So for your site make sure to size your images only as large as your content width.
File size
File size refers to the size of the image on your hard drive or server. Although you want the highest quality possible it’s best to minimise the file size load on your server and your end user. Why? Because using images with sizes larger than necessary will increase page load time and slow down your site which is one of the top reasons why users abandon a page.
Use tools like Adobe Photoshop or gimp to decrease the size of the image files on your website. These tools will also help you to maintain the quality of your images as you definitely don’t want to compress them so much that they don’t look sharp anymore.
Relevance
Every brand has a story, and choosing the right images for your content can help you to tell yours in a more appealing way. Always think about the story you want to tell and make sure your images align with it.
This means that your images need to be relevant to the content on that page as well as consistent with your brand. Here are a few good examples:
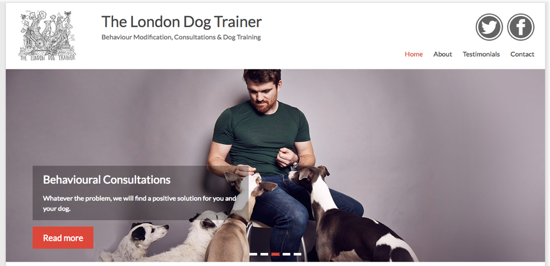
This image tells exactly what this person does and what he can achieve if hired.
So for your images to be relevant, they need to:
- Appeal to your target audience
- Represent your business as well as your ideal customer
- Complement the content and the overall design of a page
Technical aspects
Search engine bots can’t actually see your images so you need to describe them by adding an alt tag to each image. This alt tag acts as a short description of an image and it can also be a great place to add your keywords and help increase your chances of showing up in image search results.
Keep in mind though that the alt text needs to be relevant to the image. For example, you shouldn’t label an image of a coffee cup with the alt text “cheap online marketing services in London” as it doesn’t make any sense. Don’t try to trick search engines this way, as it could hurt your SEO.
So to properly optimise your images give each a clear, descriptive, relevant file name and alt text tag. If this sounds too technical, don’t worry as we’ve got a great guide that explains exactly how to optimise your images for search engines so make sure you read it.
To speed up image loading, apart from decreasing the file size, you can also use a Content Delivery Network (CDN). It’s a great way to speed up your site as well as save bandwidth.
Let’s explain. CDNs work by hosting your files across a large network of servers spread around the world. When a user visits your site from Germany, they are downloading files from the server that is closest to them. Because the bandwidth is spread across so many different servers, this also reduces the load on any single server.
Finding quality images
While taking your own photos and hiring a professional are the easiest ways to get the exact images you want, what if you don’t have the skills or the budget?
Stock photos provide a quick, affordable solution and if you can find the right images that work perfectly with your design, you’ve hit the jack pot.
Fortunately, there are lots of places where you can find good images to use on your site, both rights free/ creative commons and paid. Here are a few of the most popular ones:
- Pixabay (free)
- Gratisography (free)
- ISO Republic (free)
- BigStock (paid)
- Dreamstime (paid)
- Shutterstock (paid)
This post includes the ultimate list of places to source images for all budgets – from free sources to more expensive ones.
If you decide to go with free images, make sure you also pay attention to the license to ensure you have the right to use them for commercial projects, and also if you have to give credit to the author. If you’re not familiar with creative commons, we’ve also written a post that includes a section where we explain the legal issues of using images so make sure you read it.
Creating your own images
As we mentioned before, creating your own images is the best and cheapest way to get visuals on your website. Plus, you’ll no longer have to worry about copyright or other legal issues. So if you have a bit of talent, a digital camera (sometimes a mobile phone with a good camera will do) and an image editor, you can shoot and use your own photos.
Choosing to create your own photos will not only save you money but it also allows you to add a touch of personality and uniqueness to your site. Since you’re not using the stock images that everyone else is using, including your competitors, you’re already special in the eyes of your potential customers.
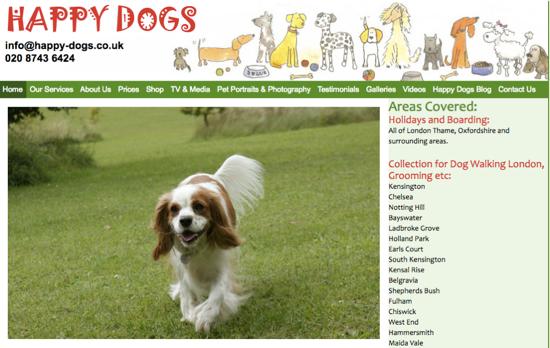
For example, if you’re a dog walker you can easily take photos of the dogs you’re walking with your phone:
To edit your images and ensure they match your site’s colour scheme and layout, you can use editing tools like Adobe Photoshop, Canva and PicMonkey.
How do I take a screenshot or record my screen?
Windows
Full-screen Screenshot: Press the Windows key + Print Screen (often labeled “PrtScn”) simultaneously. The image saves automatically to your Pictures folder within a subfolder titled “Screenshots.”
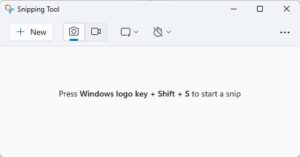
Snipping Tool: Search for “Snipping Tool” in the Start Menu. Once open, you can take rectangular free-form, window, or full-screen snips. You can even add basic annotations before saving your screenshot.
In early 2023, Windows 11 devices got a new Screen Recorder in the Snipping Tool. Now you can pick and tweak what you want to record on your screen, preview it, and share it hassle-free. Simply open the Snipping Tool, hit Record, and you’re good to go. You can pause and continue the recording at anytime.
Mac
Full-screen Screenshot: Press Command + Shift + 3 together. The screenshot appears as a file on your desktop.
Selective Screenshot: Press Command + Shift + 4. Your cursor turns into a crosshair, allowing you to click and drag a box around the area you want to capture. The image is saved to your desktop.
Similar to the Screen Recorder in Windows, Mac users get a built-in screen recording feature that lets you capture your screen, edit the recording, and share it with others. To start a screen recording on a Mac, just use the keyboard shortcut Command + Shift + 5 to access the Screen Recording controls.
Linux
Full-screen Screenshot: Press the Print Screen (“PrtScn”) key. You’ll usually be prompted to choose where to save the screenshot.
Selective Screenshot: Press Shift + Print Screen, then click and drag to select the area you want. The screenshot will typically be saved to your Pictures folder.
Note: Some Linux distributions may have slightly different default shortcuts or offer dedicated screenshot apps. Check the documentation for your specific distribution for the most accurate instructions.
Android
On most Android phones, press and hold the Power and Volume Down buttons simultaneously for a brief moment. You’ll see a visual confirmation that the screenshot has been taken. You have the option to record your screen as well. Pull down the Quick Settings Panel and swipe down from the top of the screen to fully expand the Quick Settings panel. Find the Screen Recorder Icon (the icon is usually a camera icon with a dot in the center) and follow the instructions.
iOS (iPhone/iPad)
To take a screen shot on devices with a Home button: Press the Home button and the Power button (on the side or top of the device) together at the same time. If your devices doesn’t feature a Home button, you’ll need to press the Power button and the Volume Up button simultaneously.
Remember: Always make sure you have the right to use any images on your site. Don’t use images without permission – try free image websites or make your own!
You’ve got this!
Images can be your greatest secret weapon as long as you use the right ones that can help tell your story. High-quality images are important for websites because they make the site look better, seem more professional, and keep visitors interested. Great images grab attention, explain things easily, and leave a good impression. Hopefully, our post has shed some light into what makes a good images and how to select the ones that match your site and your business.